
LedBorg - An ultra bright RGB LED add on board for your Raspberry Pi
Lesson plan
Installation of the new LedBorg softwareLesson 1. Our first Python example
Lesson 2. Simplifying the code
Lesson 3. Produce a sequence of colours
Lesson 4. Taking user input
Lesson 5. Brightness levels (PWM)
Lesson 6. A simple dialog (GUI)
Lesson 7. Using a pre-made dialog
Using a pre-made dialog
In the previous lesson we saw how we can make our own dialog, but there are plenty which have already been made for us already, for example:- Simple message pop-up
- Font selection
- Colour selection
- File selection dialog
If we were to write a pretty looking colour selection dialog it would be much longer!
We can make use of pre-made dialogs in a similar way to how we made use of functions before.
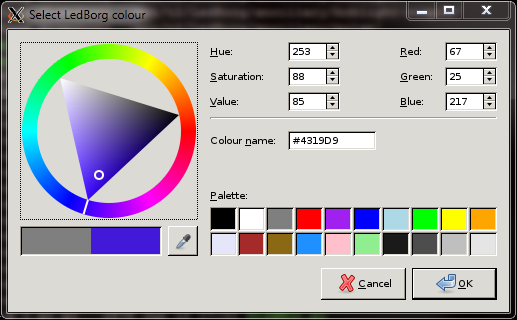
In this lesson we will show you an example of using the standard colour selection dialog to control the displayed LedBorg colour:

Starting the new script
Before we start we need to make sure we have the pygtk library available.In the terminal use the following command:
sudo apt-get -y install python-gtk2We can modify the lesson6.py script to use this new method, start by copying the old script:
cp lesson6.py lesson7.pyThen open up the new script in your editor and remove all the lines from line 30 onwards.
This time we will be using pygtk instead of Tkinter, so we remove the imports for time and Tkinter and then add the imports for pygtk.
# Import library functions we need
import wiringpi2 as wiringpi
wiringpi.wiringPiSetup()
import pygtk
pygtk.require('2.0')
import gtk
Notice we have another line in the import statements which tells pygtk we want to use the version 2 library.It is important that this line is before the
import gtk, otherwise it will have no effect.Getting the new colour
Like the previous lesson, we will have a function which is called when the dialog has a new colour value.We will write this function before we make the dialog this time.
# A function to handle the colour selection dialog change event
def ColourChangedEvent(widget):
    global colourSelectionDialog

    # Get current colour
    colour = colourSelectionDialog.colorsel.get_current_color()
The function we have made takes a widget variable, this is the name pygtk uses to refer to on screen objects.In this case the widget will be whichever object calls the function, we do not actually care this time.
We have a
global statement as the first line in the function.The global statement tells Python to find the named variable in a place where any function or object can find it.
This is important because without it the function may look for a local variable (a variable belonging to the function itself).
Line 38 is a bit long-winded, it basically gets the colour selected from the colour selection dialog we will make later and puts it into a separate variable.
Now we have a colour object, we need to get the
    # Read the red, green, and blue levels to use
    red = colour.red_float
    green = colour.green_float
    blue = colour.blue_float

    # Set the LedBorg colours
    SetLedBorg(red, green, blue)
We use the
_float values as they are already in the 0 to 1 range we want.Creating the dialog
Now we need to create one of these colour selection dialogs to show the user:
# Create colour selection dialog
global colourSelectionDialog
colourSelectionDialog = gtk.ColorSelectionDialog("Select LedBorg colour")

# Get the ColorSelection widget
colourSelection = colourSelectionDialog.colorsel
colourSelection.set_has_palette(True)
Once again we tell Python we want the colourSelectionDialog to be a globally accessible variable.Next we create a new dialog instance from the gtk class, like we did with our own class in the previous lesson.
This class takes a string value, this will be the title displayed on the dialog.
The last two lines grab the widget responsible for the actual colour selection and then tell it we want the palette (a list of recently used or common colours) to be shown.
We could use
False instead to hide the palette, however it leaves an empty space so we will leave it visible.Displaying the dialog
Now we have the dialog we can make it visible.We can also attach our function we wrote before to capture the colour changes.
# Connect to the "color_changed" signal to our function
colourSelection.connect("color_changed", ColourChangedEvent)

# Show the dialog
response = colourSelectionDialog.run()

# Turn LedBorg off after we are finished
LedBorgOff()
The first line causes our function to be called whenever a colour_changed event is raised by the colour selection widget.The second line makes the dialog visible and takes over control until it has finished, like the mainloop call in the previous example.
The returned value tells us if the user pressed the OK or Cancel button when the dialog was closed.
We do not use it in this example, but it is often useful to know this for other uses, such as changing you desktop background colour.
The final line turns LedBorg off when we are done, and that is the end of our script ^_^
The complete script
The completed script can be downloaded directly to the Raspberry Pi using:wget -O lesson7.py http://www.piborg.org/downloads/ledborg-new/lesson7.txtRemember we make the script executable with:
chmod +x lesson7.pythis script we also need to run it with gksudo instead of sudo:
gksudo ./lesson7.py
#!/usr/bin/env python
# coding: latin-1

# Import library functions we need
import wiringpi2 as wiringpi
wiringpi.wiringPiSetup()
import pygtk
pygtk.require('2.0')
import gtk

# Setup software PWMs on the GPIO pins
PIN_RED = 0
PIN_GREEN = 2
PIN_BLUE = 3
LED_MAX = 100
wiringpi.softPwmCreate(PIN_RED,   0, LED_MAX)
wiringpi.softPwmCreate(PIN_GREEN, 0, LED_MAX)
wiringpi.softPwmCreate(PIN_BLUE,  0, LED_MAX)
wiringpi.softPwmWrite(PIN_RED,   0)
wiringpi.softPwmWrite(PIN_GREEN, 0)
wiringpi.softPwmWrite(PIN_BLUE,  0)

# A function to set the LedBorg colours
def SetLedBorg(red, green, blue):
    wiringpi.softPwmWrite(PIN_RED,   int(red   * LED_MAX))
    wiringpi.softPwmWrite(PIN_GREEN, int(green * LED_MAX))
    wiringpi.softPwmWrite(PIN_BLUE,  int(blue  * LED_MAX))

# A function to turn the LedBorg off
def LedBorgOff():
    SetLedBorg(0, 0, 0)

# A function to handle the colour selection dialog change event
def ColourChangedEvent(widget):
    global colourSelectionDialog

    # Get current colour
    colour = colourSelectionDialog.colorsel.get_current_color()

    # Read the red, green, and blue levels to use
    red = colour.red_float
    green = colour.green_float
    blue = colour.blue_float

    # Set the LedBorg colours
    SetLedBorg(red, green, blue)

# Create colour selection dialog
global colourSelectionDialog
colourSelectionDialog = gtk.ColorSelectionDialog("Select LedBorg colour")

# Get the ColorSelection widget
colourSelection = colourSelectionDialog.colorsel
colourSelection.set_has_palette(True)

# Connect to the "color_changed" signal to our function
colourSelection.connect("color_changed", ColourChangedEvent)

# Show the dialog
response = colourSelectionDialog.run()

# Turn LedBorg off after we are finished
LedBorgOff()
Now you know how to operate LedBorg check out the examples tab for more examples of how you can take LedBorg and make it do fun things, like checking for updates or monitoring temperature.