LedBorg - An ultra bright RGB LED add on board for your Raspberry Pi
Lesson plan
Installation of the new LedBorg softwareLesson 1. Our first Python example
Lesson 2. Simplifying the code
Lesson 3. Produce a sequence of colours
Lesson 4. Taking user input
Lesson 5. Brightness levels (PWM)
Lesson 6. A simple dialog (GUI)
Lesson 7. Using a pre-made dialog
A simple dialog (GUI)
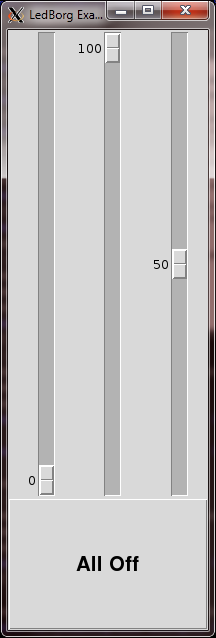
If we want to experiment with the various possible LedBorg colour combinations, it would be great if we could run a dialog (GUI) which allows use to control the

We can modify the lesson5.py script to use this new method, start by copying the old script:
cp lesson5.py lesson6.pyThen open up the new script in your editor and remove all the lines from line 30 onwards.
We will be using the Tkinter library to do most of the heavy lifting for us, dialogs can be a lot of code to write!
To use the library we need to import it first, add the line highlighted below:
#!/usr/bin/env python

# Import library functions we need
import time
import Tkinter
import wiringpi2 as wiringpi
wiringpi.wiringPiSetup()
Constructing a dialog
For us to make a dialog using Tkinter we need to make a class to represent our dialog.A class is like a template or blueprint for constructing an object, it defines functions which tell the system how that object will work.
We will write one of these classes, then create an object from it which will be our dialog shown on the screen.
Let us start writing the class:
# Class representing the GUI dialog
class LedBorg_tk(Tkinter.Tk):
    # Constructor (called when the object is first created)
    def __init__(self, parent):
		# Setup the parent object
        Tkinter.Tk.__init__(self, parent)
        self.parent = parent
        self.protocol("WM_DELETE_WINDOW", self.OnExit) # Call the OnExit function when user closes the dialog
This first part of the class has a lot of parts to it, most of which will be common for any dialog class we would write.Line 32 tells Python we are making a new class called
LedBorg_tk, which will inherit from the class Tkinter.TkWhen a class inherits another it gains all of the functionality of that class, in our case that class deals with all the nasty code which works out where the mouse is, how to resize the dialog, if the user just clicked on something and so on.
We use inheritance like this so that we do not have to write everything again each time we need to create a new dialog, it saves a massive amount of typing!
Line 34 defines a function called
__init__, this is a special function because it gets called when a new object is created using this class.The self variable is the object itself, which all functions belonging to a class will have as their first value.
The parent variable is whichever container this dialog lives in (part of how Tkinter works), we will come back to that later on but it is not normally important for dialog objects.
Line 36 gets the inherited class,
Tkinter.Tk, to call its own __init__ function, in most cases of inheritance this should be the first thing you do inside your __init__ function.Line 37 makes a note of who the parent object is in a variable which belongs to this object.
This is also common practice for
__init__ functions.Finally line 38 tells Tkinter we want a function called
OnExit to be called when the user closes this dialog.We will need to create this function before we are done.
We will also make some variables to let us know what colour has been set:
        # Set any state variables
        self.red = 0
        self.green = 0
        self.blue = 0
These variables work the same way as the variables we have used before, but the
self. at the start of their name means that they belong to the object, in this case our dialog.Creating some sliders
Now we have a dialog without anything on it we need to decide how we will control the LedBorg.One way of controlling the level of something is with a slider:
        # Setup a grid of 3 sliders which control red, green, and blue
        self.grid()
        self.sldRed = Tkinter.Scale(self, from_ = LED_MAX, to = 0, orient = Tkinter.VERTICAL, command = self.sldRed_move)
        self.sldRed.set(0)
        self.sldRed.grid(column = 0, row = 0, rowspan = 1, columnspan = 1, sticky = 'NSEW')
Line 44 sets up a grid which we can use to tell each object where it belongs on the screen.
We will come back to how it is sized later on.
Line 45 creates our slider object, which is known as a Scale in Tkinter.
We set the maximum and minimum values the slider can produce to be the same as the PWM range, and make it a vertical slider (they can also be horizontal).
Finally we tell Tkinter to call a function called
sldRed_move when the slider position gets changed.We will need to create the function itself later.
Line 46 changes the sliders position to 0, the minimum value.
Line 47 tells the slider to put itself on the first row, first column of the grid, it will take a grid slot of size 1 × 1.
Now we have one slider to control
        self.sldGreen = Tkinter.Scale(self, from_ = LED_MAX, to = 0, orient = Tkinter.VERTICAL, command = self.sldGreen_move)
        self.sldGreen.set(0)
        self.sldGreen.grid(column = 1, row = 0, rowspan = 1, columnspan = 1, sticky = 'NSEW')
        self.sldBlue = Tkinter.Scale(self, from_ = LED_MAX, to = 0, orient = Tkinter.VERTICAL, command = self.sldBlue_move)
        self.sldBlue.set(0)
        self.sldBlue.grid(column = 2, row = 0, rowspan = 1, columnspan = 1, sticky = 'NSEW')
Placing a button
Now we have some sliders we will add a button below them.To make the button look sensible we want it to span all three columns, meaning the .grid line needs a columnspan of 3:
        # Make an Off button
        self.butOff = Tkinter.Button(self, text = 'All Off', command = self.butOff_click)
        self.butOff['font'] = ("Arial", 20, "bold")
        self.butOff.grid(column = 0, row = 1, rowspan = 1, columnspan = 3, sticky = 'NSEW')
The button is slightly simpler to set up compared to the sliders.We set the text “All off” to be shown on the button, and tell the button which function to call when it is clicked.
Notice we also set a property, the font, by using a separate call after creating the button.
We could have set the font in the same line we set the text, but the nice thing about how we set the font is that it allows us to change settings after the button has been created.
This can be useful if you wanted to change the text, for example after the user tells you their name.
Setting the grid layout
Now we need to set the shape our grid looks:# Set our grid layout, make the sliders taller than the button self.grid_columnconfigure(0, weight = 1) self.grid_columnconfigure(1, weight = 1) self.grid_columnconfigure(2, weight = 1) self.grid_rowconfigure(0, weight = 4) self.grid_rowconfigure(1, weight = 1)The weight property determines how Tkinter scales column and row sizes, the larger the number the quicker a row or column gets larger to fill the dialog.
We make all three columns the same weight which should make them equally sized, we make the first row grow faster than the second row by giving it a larger weight, this means that the sliders should be taller than the button.
Finishing the initialisation
Once the__init__ function completes, the dialog will become visible.We need to set some final options:
# Set the size and name of the dialog
self.resizable(True, True)
self.geometry('200x600')
self.title('LedBorg Example GUI')
# Setup the initial colour
SetLedBorg(self.red, self.green, self.blue)
This makes the dialog resizable in both width and height, 200 × 600 pixels starting size, gives it a title, and finally finishes by making sure the LedBorg has its initial colour set.Now we have set up how our dialog looks, we need to tell it how it works.
We do this by setting up the five functions below that we named earlier in the code.
The OnExit function
We told Tkinter to call a function namedOnExit when the user tells the dialog to close (clicks the X in the top-right corner).This function will turn the LedBorg off, then tell the dialog to finish running:
# Called when the user closes the dialog def OnExit(self): # Turn the LedBorg off and end the program LedBorgOff() self.quit()
The slider movement functions
Each slider had a differently named function that would be called when it is moved.Here is the
sldRed_move function:# Called when sldRed is moved def sldRed_move(self, value): # Update the red value then set the colour again self.red = float(value) / LED_MAX SetLedBorg(self.red, self.green, self.blue)Notice this function gets passed a value, in this case the position the slider has been moved to.
First we take that value and convert it to the 0 to 1 range (we use the float function to ensure we will get an answer including a fractional part), then assign it to the appropriate variable.
Secondly we set the LedBorg colour using the three colour variables which belong to the dialog object.
The
sldGreen_move and sldBlue_move functions are nearly identical:# Called when sldGreen is moved def sldGreen_move(self, value): # Update the green value then set the colour again self.green = float(value) / LED_MAX SetLedBorg(self.red, self.green, self.blue) # Called when sldBlue is moved def sldBlue_move(self, value): # Update the blue value then set the colour again self.blue = float(value) / LED_MAX SetLedBorg(self.red, self.green, self.blue)
The butOff_click function
The final function happens when we click the all off button:# Called when butOff is clicked def butOff_click(self): self.sldRed.set(0) self.sldGreen.set(0) self.sldBlue.set(0)This function moves all three sliders to the off position.
When each slider is moved its movement function will be called as if the user had moved the slider themselves, therefore each call will not only move the slider back to 0, it will also turn that colour off for us as well.
Running the dialog
We have now completely coded our dialog, all that remains is to get Python to make one:# Create a copy of the LedBorg GUI and pass control to it app = LedBorg_tk(None) app.mainloop()Line 102 creates a new dialog by using the class definition we created on lines 31 to 99.
Remember the parent variable way back at the start, the None value we pass is our way of telling Python there is no parent in this case.
Our final line, 103, tells Python to pass control to the dialog until it is finished.
This has the effect of holding our program at this line until the self.quit() call back on line 75.
The complete script
The completed script can be downloaded directly to the Raspberry Pi using:wget -O lesson6.py http://www.piborg.org/downloads/ledborg-new/lesson6.txtRemember we make the script executable with:
chmod +x lesson6.pythis time we need to run it with gksudo instead of sudo:
gksudo ./lesson6.pygksudo is similar to sudo, but it also allows access to drawing things on the screen.
The biggest problem with gksudo is that errors in our script which cause it to end abruptly (like using a variable which does not exist) will cause our script to end without printing the normal error message, this can make fixing errors difficult.
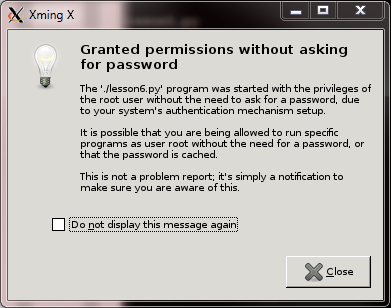
Secondly we may get presented with the following dialog:

You can safely ignore this warning.
#!/usr/bin/env python
# Import library functions we need
import time
import Tkinter
import wiringpi2 as wiringpi
wiringpi.wiringPiSetup()
# Setup software PWMs on the GPIO pins
PIN_RED = 0
PIN_GREEN = 2
PIN_BLUE = 3
LED_MAX = 100
wiringpi.softPwmCreate(PIN_RED, 0, LED_MAX)
wiringpi.softPwmCreate(PIN_GREEN, 0, LED_MAX)
wiringpi.softPwmCreate(PIN_BLUE, 0, LED_MAX)
wiringpi.softPwmWrite(PIN_RED, 0)
wiringpi.softPwmWrite(PIN_GREEN, 0)
wiringpi.softPwmWrite(PIN_BLUE, 0)
# A function to set the LedBorg colours
def SetLedBorg(red, green, blue):
wiringpi.softPwmWrite(PIN_RED, int(red * LED_MAX))
wiringpi.softPwmWrite(PIN_GREEN, int(green * LED_MAX))
wiringpi.softPwmWrite(PIN_BLUE, int(blue * LED_MAX))
# A function to turn the LedBorg off
def LedBorgOff():
SetLedBorg(0, 0, 0)
# Class representing the GUI dialog
class LedBorg_tk(Tkinter.Tk):
# Constructor (called when the object is first created)
def __init__(self, parent):
# Setup the parent object
Tkinter.Tk.__init__(self, parent)
self.parent = parent
self.protocol("WM_DELETE_WINDOW", self.OnExit) # Call the OnExit function when user closes the dialog
# Set any state variables
self.red = 0
self.green = 0
self.blue = 0
# Setup a grid of 3 sliders which control red, green, and blue
self.grid()
self.sldRed = Tkinter.Scale(self, from_ = LED_MAX, to = 0, orient = Tkinter.VERTICAL, command = self.sldRed_move)
self.sldRed.set(0)
self.sldRed.grid(column = 0, row = 0, rowspan = 1, columnspan = 1, sticky = 'NSEW')
self.sldGreen = Tkinter.Scale(self, from_ = LED_MAX, to = 0, orient = Tkinter.VERTICAL, command = self.sldGreen_move)
self.sldGreen.set(0)
self.sldGreen.grid(column = 1, row = 0, rowspan = 1, columnspan = 1, sticky = 'NSEW')
self.sldBlue = Tkinter.Scale(self, from_ = LED_MAX, to = 0, orient = Tkinter.VERTICAL, command = self.sldBlue_move)
self.sldBlue.set(0)
self.sldBlue.grid(column = 2, row = 0, rowspan = 1, columnspan = 1, sticky = 'NSEW')
# Make an Off button
self.butOff = Tkinter.Button(self, text = 'All Off', command = self.butOff_click)
self.butOff['font'] = ("Arial", 20, "bold")
self.butOff.grid(column = 0, row = 1, rowspan = 1, columnspan = 3, sticky = 'NSEW')
        # Set our grid layout, make the sliders taller than the button
        self.grid_columnconfigure(0, weight = 1)
        self.grid_columnconfigure(1, weight = 1)
        self.grid_columnconfigure(2, weight = 1)
        self.grid_rowconfigure(0, weight = 4)
        self.grid_rowconfigure(1, weight = 1)
        # Set the size and name of the dialog
        self.resizable(True, True)
        self.geometry('200x600')
        self.title('LedBorg Example GUI')
        # Setup the initial colour
        SetLedBorg(self.red, self.green, self.blue)
    # Called when the user closes the dialog
    def OnExit(self):
        # Turn the LedBorg off and end the program
        LedBorgOff()
        self.quit()
    # Called when sldRed is moved
    def sldRed_move(self, value):
        # Update the red value then set the colour again
        self.red = float(value) / LED_MAX
        SetLedBorg(self.red, self.green, self.blue)
    # Called when sldGreen is moved
    def sldGreen_move(self, value):
        # Update the green value then set the colour again
        self.green = float(value) / LED_MAX
        SetLedBorg(self.red, self.green, self.blue)

    # Called when sldBlue is moved
    def sldBlue_move(self, value):
        # Update the blue value then set the colour again
        self.blue = float(value) / LED_MAX
        SetLedBorg(self.red, self.green, self.blue)
    # Called when butOff is clicked
    def butOff_click(self):
        self.sldRed.set(0)
        self.sldGreen.set(0)
        self.sldBlue.set(0)
# Create a copy of the LedBorg GUI and pass control to it
app = LedBorg_tk(None)
app.mainloop()
Continue to lesson 7. Using a pre-made dialog


