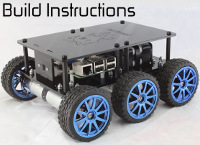
DiddyBorg Red Edition - Because red ones go faster
Before starting
We recommend that you setup the software for running DiddyBorg Red Edition before assembling him.These instructions assume you are running a recent copy of Raspbian.
They also assume you are using the
pi user (the default for Raspbian).If you do not have your SD card setup yet you can find the downloads and instructions at http://www.raspberrypi.org/downloads.
These instructions require the Raspberry Pi to be connected to the internet in order to download the required software.
If you are using a Model A or Model A+ we recommend you use a USB hub and a WiFi dongle to perform the initial setup.
Setting up the Raspberry Pi
Since the Raspberry Pi is difficult to access inside the DiddyBorg Red Edition, we recommend you setup SSH so you can login to the Raspberry Pi using a network cable.To setup SSH access:
- Enter the following command in a terminal:
sudo raspi-config - Move down to option
8 Advanced Optionsand press ENTER - Move down to option
A4 SSHand press ENTER - Make sure
Enableis highlighted and press ENTER - Wait until the dialog says SSH is enabled, then press ENTER
- Move right until
Finishis highlighted, then press ENTER
Consult you router manual if you wish to do this.
Installing the PicoBorg Reverse
The DiddyBorg Red Edition uses a PicoBorg Reverse to drive the motors.We will connect the board later, for now we simply need to install the software to control it.
You may need to enable I2C first, to do this:
- Enter the following command in a terminal:
sudo raspi-config - Move down to option
8 Advanced Optionsand press ENTER - Move down to option
A7 I2Cand press ENTER - Make sure
Yesis highlighted and press ENTER - When the dialog says I2C is enabled press ENTER
- Make sure
Yesis highlighted again and press ENTER - When the dialog says I2C will be loaded by default press ENTER
- Move right until
Finishis highlighted, then press ENTER
To run through the automatic installer just use this one line in a terminal:
bash <(curl https://www.piborg.org/install-picoborgrev.txt)If you would prefer to manually run through the steps use the commands below:
mkdir ~/picoborgrev
cd ~/picoborgrev
wget http://www.piborg.org/downloads/picoborgrev/examples.zip
unzip examples.zip
chmod +x install.sh
./install.sh
Installing the DiddyBorg Red Edition examples
We have some example scripts for controlling DiddyBorg Red Edition setup and ready to run.To run through the automatic installer just use this one line in a terminal:
bash <(curl https://www.piborg.org/install-diddyred.txt)If you would prefer to manually run through the steps use the commands below:
mkdir ~/diddyred
cd ~/diddyred
wget http://www.piborg.org/downloads/diddyred/examples.zip
unzip examples.zip
chmod +x install.sh
./install.sh
Setting up joystick control (optional)
If you wish to use a gamepad / joystick to control DiddyBorg Red Edition (such as a PS3 controller) you need the joystick software.You can get this by running the following command:
sudo apt-get -y install joystickIf you are using a PS3 controller then you will also need to install some additional tools.
See our PS3 controller getting started page to setup a PS3 controller.
Setting up the Raspberry Pi camera (optional)
If you want to use the Raspberry Pi camera you will also need to install some additional software libraries.Before setting up the software, turn the Raspberry Pi off and connect the camera to the Raspberry Pi.
After powering the Raspberry Pi you want to enable the camera functionality:
- Enter the following command in a terminal:
sudo raspi-config - Move down to option
5 Enable cameraand press ENTER - Make right until
Enableis highlighted and press ENTER - Move right until
Finishis highlighted, then press ENTER - If asked if you would like to reboot, make sure
Yesis highlighted, then press ENTER - Wait for the Raspberry Pi to restart
raspistill -dIf the camera is working you should see the image from the camera on the monitor for a few seconds.
If it is not working or incorrectly connected you will get error messages instead.
Next we want to install the Python library for talking to the camera:
sudo apt-get -y install python-picameraFinally if we want to do image processing then we want the OpenCV libraries as well.
This is needed for the ball-chasing example.
This download is a bit larger and may take a while:
sudo apt-get -y install libcv-dev libopencv-dev python-opencv
Before assembling the DiddyBorg Red Edition
Now we have all the code ready to go, there are a few things we want to do before assembling him.- If you plan to use SSH to talk to the Raspberry Pi once assembled check it works before assembly
- If you are using a joystick to control DiddyBorg Red Edition, attach it to the Raspberry Pi and use
jstestto check it works
See our JoyBorg script page for instructions on how to check this - If you want to use any of our examples check the settings (such as joystick button numbers) are correct, change them if necessary
- The examples can be setup to run when the Raspberry Pi starts, find the script you want below for instructions on how to do this
- If you wish to use any other devices (such as a WiFi dongle), now is the best time to set them up and make sure they work
- Finally before assembling power the Raspberry Pi off and detach the camera
The example scripts
These are the example scripts for DiddyBorg Red Edition.They demonstrate how DiddyBorg Red Edition can be used for both autonomous and manual control.
You can view the full source code here.
Simple movement - diddyRedSequence.py
This script provides a simple example of moving DiddyBorg Red Edition around in PythonIt should move in a pattern which matches the following sequence:
- Move in a square (~40 cm in size)
- Move to the centre of the square in a single line
- Spin around in both directions
- Move back to the start as two separate lines
On different surfaces he will move quicker or slower, which means the settings may need adjusting for the surface.
This script is the best starting point for writing your own autonomous robot code from the examples available.
It is also the shortest and simplest of the examples.
Settings
These are the various settings in the script by line number:- 32
timeForward1m: the number of seconds needed to move forward 1 meter
You can check this using test mode - 33
timeSpin360: the number of seconds needed to spin a full 360°
You can check this using test mode - 34
testMode: set toTrueto test the settings above, set toFalseto run the sequence instead
- If the forward / backward drive goes too far, decrease
timeForward1m - If the forward / backward drive does not go far enough, increase
timeForward1m - If the left / right spin turns more than once, decrease
timeSpin360 - If the left / right spin turns less than once, increase
timeSpin360
Run once
Go to the DiddyBorg Red Edition code directory:cd ~/diddyredthen run the script directly:
./diddyRedSequence.pyRun at startup
Make sure the script is not in test mode, otherwise it will not run!Open crontab to make an addition using:
crontab -ethis will open the scheduled task list in your default text editor (usually nano).
Add the following line to the bottom of the file:
@reboot /home/pi/diddyred/diddyRedSequence.pythe script should now run whenever the Raspberry Pi is restarted / powered up.
Joystick control - diddyRedJoy.py
This script demonstrates how you can control DiddyBorg Red Edition using a gamepad or joystick.The script requires the optional joystick setup to be completed.
You may wish to change which buttons on the gamepad / joystick perform which actions.
See our JoyBorg script page to work out which button numbers are which actual buttons, or see our PS3 controller page for the numbers if you plan on using a PS3 controller.
Settings
Joystick control settings:- 43
axisUpDown: the axis index used for speed control - 44
axisUpDownInverted: set toTrueif the robot runs the wrong way - 45
axisLeftRight: the axis index used for steering control - 46
axisLeftRightInverted: set toTrueif the robot turns the wrong way - 47
buttonResetEpo: the button index used for resetting the safety stop, generally should not be needed - 48
buttonSlow: the button index used for hold to drive slowly - 49
slowFactor: the maximum drive speed when the hold to drive slowly button is held - 50
buttonFastTurn: the button index used for hold to turn fast, allows turning on the spot whilst held - 51
interval: the time between updates, smaller responds better, larger uses less processor time (conserve battery), the default of 0 means as fast as possible
- 54
voltageIn: the total provided battery voltage (1.2v per rechargeable AA) - 44
voltageOut: the maximum voltage to run the motors at, the DiddyBorg Red Edition motors are designed to run at 12v
Default PS3 buttons
The default values when using a PS3 controller correspond to: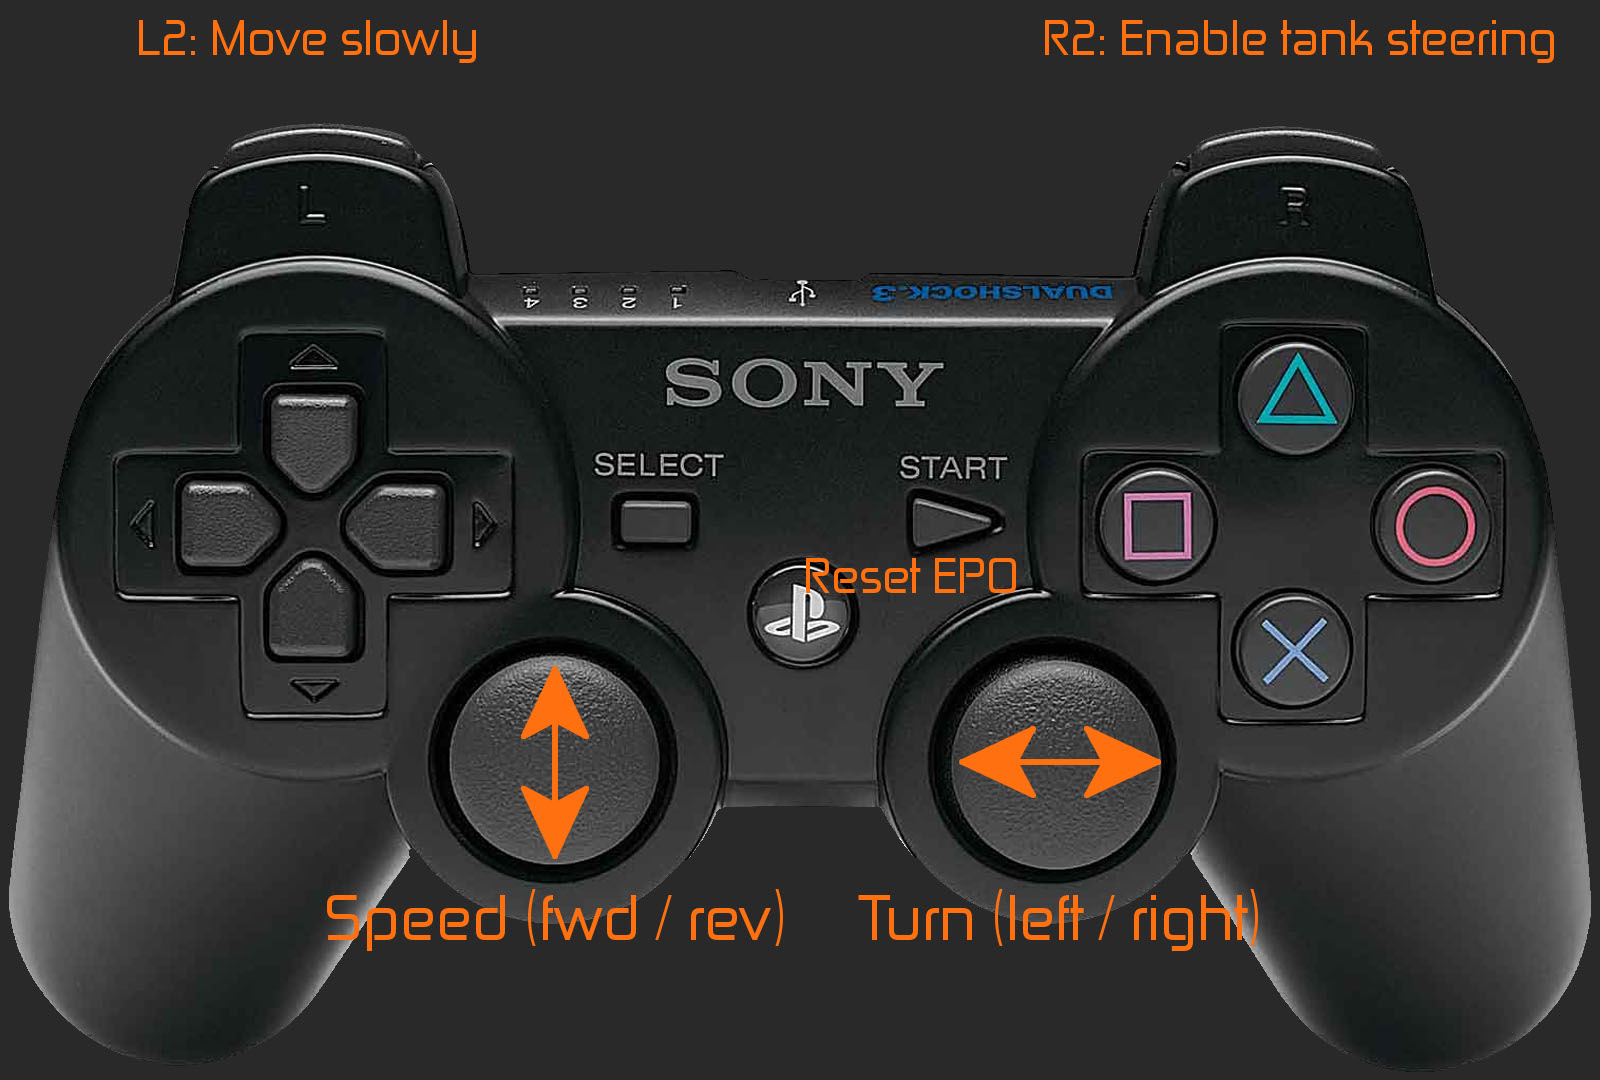
- Left stick up / down: Speed control
- Right stick left / right: Steering control
- L2: Drive slowly whilst held (limits to 50% speed)
- R2: Turn fast whilst held (allows on the spot turning)
- Start button: Resets the safety stop if tripped (indicated by script using the LED)
Run once
Go to the DiddyBorg Red Edition code directory:cd ~/diddyredif you are using a PS3 controller and need to start the sixad process use the PS3 launcher:
./ps3DiddyRedJoy.shotherwise run the script using the simple launcher:
./runDiddyRedJoy.shRun at startup
Open crontab to make an addition using:crontab -ethis will open the scheduled task list in your default text editor (usually nano).
If you are using a PS3 controller add the following line to the bottom of the file:
@reboot /home/pi/diddyred/ps3DiddyRedJoy.shif you are not then add the following line instead:
@reboot /home/pi/diddyred/runDiddyRedJoy.shthe script should now run whenever the Raspberry Pi is restarted / powered up.
Ball following - diddyRedFollowBall.py
This script demonstrates how DiddyBorg Red Edition can become autonomous and run by himself.We only use the Raspberry Pi camera in this example, but you could attach other sensors to perform other tasks.
The script requires the optional camera setup to be completed.
Settings
Power control settings:- 56
voltageIn: the total provided battery voltage (1.2v per rechargeable AA) - 57
voltageOut: the maximum voltage to run the motors at, the DiddyBorg Red Edition motors are designed to run at 12v
- 60
imageWidth: the width of the image to capture from the camera, larger takes longer to process - 61
imageHeight: the height of the image to capture from the camera, larger takes longer to process - 62
frameRate: the number of images to capture per second from the camera, too large and DiddyBorg Red Edition will become slow to respond to changes in position
- 65
autoMaxPower: the fastest DiddyBorg Red Edition will move under automatic control, 1.0 represents the full power set byvoltageOut - 66
autoMinPower: the slowest DiddyBorg Red Edition will move under automatic control (when not stopped), 0.2 represents 20% of thevoltageOutsetting - 67
autoMinArea: the area which the target needs to occupy in the image before attempting to move towards it - 68
autoMaxArea: the area which the target needs to occupy in the image before deciding DiddyBorg Red Edition is close enough and stops moving - 69
autoFullSpeedArea: the area which the target needs to occupy more than before DiddyBorg Red Edition starts slowing down from autoMaxPower, set the same as autoMaxArea to not slow down at all
Run once
Go to the DiddyBorg Red Edition code directory:cd ~/diddyredthen run the script directly:
./diddyRedFollowBall.pyRun at startup
Make sure the script is not in test mode, otherwise it will not run!Open crontab to make an addition using:
crontab -ethis will open the scheduled task list in your default text editor (usually nano).
Add the following line to the bottom of the file:
@reboot /home/pi/diddyred/diddyRedFollowBall.pythe script should now run whenever the Raspberry Pi is restarted / powered up.
Joystick control and ball following - diddyRedJoyBall.py
This script demonstrates how you can control DiddyBorg Red Edition using a gamepad or joystick, but also how at the press of a button he can become autonomous and run by himself.This is the most complex example in the list, it shows how automatic and manual control can be combined into a single piece of code.
The script requires the optional joystick and camera setups to be completed.
You may wish to change which buttons on the gamepad / joystick perform which actions.
See our JoyBorg script page to work out which button numbers are which actual buttons, or see our PS3 controller page for the numbers if you plan on using a PS3 controller.
Settings
Joystick control settings:- 61
axisUpDown: the axis index used for speed control - 62
axisUpDownInverted: set toTrueif the robot runs the wrong way - 63
axisLeftRight: the axis index used for steering control - 64
axisLeftRightInverted: set toTrueif the robot turns the wrong way - 65
buttonResetEpo: the button index used for resetting the safety stop, generally should not be needed - 66
buttonSlow: the button index used for hold to drive slowly - 67
slowFactor: the maximum drive speed when the hold to drive slowly button is held - 68
buttonFastTurn: the button index used for hold to turn fast, allows turning on the spot whilst held - 69
interval: the time between updates, smaller responds better, larger uses less processor time (conserve battery) - 70
controllerLostLoops: the number of loops without any update from the controller before deciding it is out-of-range
This value is well-tuned for a Bluetooth attached PS3 controller, other controllers may want larger values (if the robot appears to stop at random increase this value) - 71
buttonSetAutoMode: the button index used to enable automatic control - 71
buttonSetManualMode: the button index used to enable manual control
- 75
voltageIn: the total provided battery voltage (1.2v per rechargeable AA) - 76
voltageOut: the maximum voltage to run the motors at, the DiddyBorg motors are designed to run at 12v
- 79
imageWidth: the width of the image to capture from the camera, larger takes longer to process - 80
imageHeight: the height of the image to capture from the camera, larger takes longer to process - 81
frameRate: the number of images to capture per second from the camera, too large and DiddyBorg Red Edition will become slow to respond to changes in position
- 84
autoMaxPower: the fastest DiddyBorg Red Edition will move under automatic control, 1.0 represents full forward on the joystick - 85
autoMinPower: the slowest DiddyBorg Red Edition will move under automatic control (when not stopped), 0.2 represents 20% forward on the joystick - 86
autoMinArea: the area which the target needs to occupy in the image before attempting to move towards it - 87
autoMaxArea: the area which the target needs to occupy in the image before deciding DiddyBorg Red Edition is close enough and stops moving - 88
autoFullSpeedArea: the area which the target needs to occupy more than before DiddyBorg Red Edition starts slowing down from autoMaxPower, set the same as autoMaxArea to not slow down at all
Default PS3 buttons
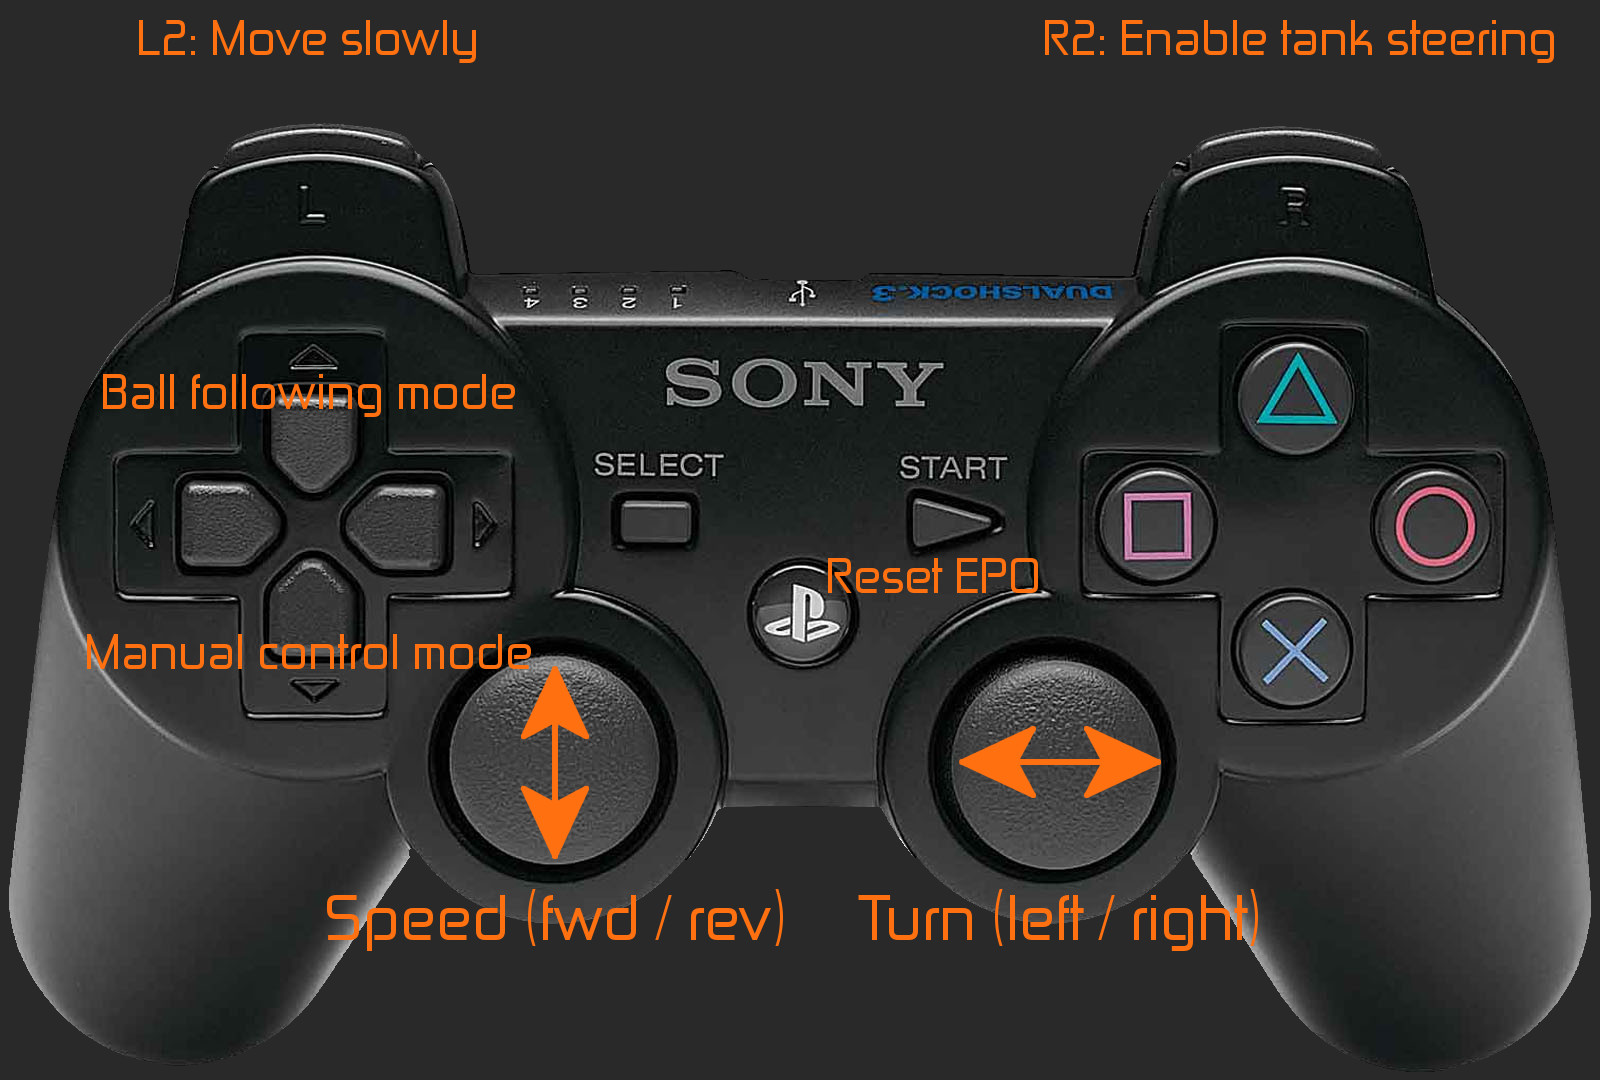
- Left stick up / down: Speed control
- Right stick left / right: Steering control
- L2: Drive slowly whilst held (limits to 50% speed)
- R2: Turn fast whilst held (allows on the spot turning)
- Start button: Resets the safety stop if tripped (indicated by script using the LED)
- D-Pad up: Switch to automatic control
- D-Pad down: Switch to manual control
Run once
Go to the DiddyBorg Red Edition code directory:cd ~/diddyredif you are using a PS3 controller and need to start the sixad process use the PS3 launcher:
./ps3DiddyRedJoyBall.shotherwise run the script using the simple launcher:
./runDiddyRedJoyBall.shRun at startup
Open crontab to make an addition using:crontab -ethis will open the scheduled task list in your default text editor (usually nano).
If you are using a PS3 controller add the following line to the bottom of the file:
@reboot /home/pi/diddyred/ps3DiddyRedJoyBall.shif you are not then add the following line instead:
@reboot /home/pi/diddyred/runDiddyRedJoyBall.shthe script should now run whenever the Raspberry Pi is restarted / powered up.
Source Listings
Here is all the source code for the example scripts above, they are all included in the download made during installation.diddyRedSequence.py
#!/usr/bin/env python
# coding: Latin-1

# Simple example of a motor sequence script

# Import library functions we need
import PicoBorgRev
import time
import math
import sys

# Setup the PicoBorg Reverse
PBR = PicoBorgRev.PicoBorgRev()
#PBR.i2cAddress = 0x44                  # Uncomment and change the value if you have changed the board address
PBR.Init()
if not PBR.foundChip:
    boards = PicoBorgRev.ScanForPicoBorgReverse()
    if len(boards) == 0:
        print 'No PicoBorg Reverse found, check you are attached :)'
    else:
        print 'No PicoBorg Reverse at address %02X, but we did find boards:' % (PBR.i2cAddress)
        for board in boards:
            print '    %02X (%d)' % (board, board)
        print 'If you need to change the I²C address change the setup line so it is correct, e.g.'
        print 'PBR.i2cAddress = 0x%02X' % (boards[0])
    sys.exit()
#PBR.SetEpoIgnore(True)                 # Uncomment to disable EPO latch, needed if you do not have a switch / jumper
PBR.SetCommsFailsafe(False)             # Disable the communications failsafe
PBR.ResetEpo()

# Movement settings (worked out from our DiddyBorg on a smooth surface)
timeForward1m = 5.7                     # Number of seconds needed to move about 1 meter
timeSpin360   = 4.8                     # Number of seconds needed to make a full left / right spin
testMode = False                        # True to run the motion tests, False to run the normal sequence

# Power settings
voltageIn = 12.0                        # Total battery voltage to the PicoBorg Reverse
voltageOut = 12.0 * 0.95                # Maximum motor voltage, we limit it to 95% to allow the RPi to get uninterrupted power

# Setup the power limits
if voltageOut > voltageIn:
    maxPower = 1.0
else:
    maxPower = voltageOut / float(voltageIn)

# Function to perform a general movement
def PerformMove(driveLeft, driveRight, numSeconds):
    # Set the motors running
    PBR.SetMotor1(driveRight * maxPower)
    PBR.SetMotor2(-driveLeft * maxPower)
    # Wait for the time
    time.sleep(numSeconds)
    # Turn the motors off
    PBR.MotorsOff()

# Function to spin an angle in degrees
def PerformSpin(angle):
    if angle < 0.0:
        # Left turn
        driveLeft  = -1.0
        driveRight = +1.0
        angle *= -1
    else:
        # Right turn
        driveLeft  = +1.0
        driveRight = -1.0
    # Calculate the required time delay
    numSeconds = (angle / 360.0) * timeSpin360
    # Perform the motion
    PerformMove(driveLeft, driveRight, numSeconds)

# Function to drive a distance in meters
def PerformDrive(meters):
    if meters < 0.0:
        # Reverse drive
        driveLeft  = -1.0
        driveRight = -1.0
        meters *= -1
    else:
        # Forward drive
        driveLeft  = +1.0
        driveRight = +1.0
    # Calculate the required time delay
    numSeconds = meters * timeForward1m
    # Perform the motion
    PerformMove(driveLeft, driveRight, numSeconds)

# Run test mode if required
if testMode:
    # Show settings
    print 'Current settings are:'
    print '    timeForward1m = %f' % (timeForward1m)
    print '    timeSpin360 = %f' % (timeSpin360)
    # Check distance
    raw_input('Check distance, Press ENTER to start')
    print 'Drive forward 30cm'
    PerformDrive(+0.3)
    raw_input('Press ENTER to continue')
    print 'Drive reverse 30cm'
    PerformDrive(-0.3)
    # Check spinning
    raw_input('Check spinning, Press ENTER to continue')
    print 'Spinning left'
    PerformSpin(-360)
    raw_input('Press ENTER to continue')
    print 'Spinning Right'
    PerformSpin(+360)
    print 'Update the settings as needed, then test again or disable test mode'
    sys.exit(0)

### Our sequence of motion goes here ###

# Draw a 40cm square
for i in range(4):
    PerformDrive(+0.4)
    PerformSpin(+90)

# Move to the middle of the square
PerformSpin(+45)
distanceToOtherCorner = math.sqrt(0.4**2 + 0.4**2) # Pythagorean theorem
PerformDrive(distanceToOtherCorner / 2.0)
PerformSpin(-45)

# Spin each way inside the square
PerformSpin(+360)
PerformSpin(-360)

# Return to the starting point
PerformDrive(-0.2)
PerformSpin(+90)
PerformDrive(-0.2)
PerformSpin(-90)
diddyRedJoy.py
#!/usr/bin/env python
# coding: Latin-1

# Load library functions we want
import time
import os
import sys
import pygame
import PicoBorgRev

# Re-direct our output to standard error, we need to ignore standard out to hide some nasty print statements from pygame
sys.stdout = sys.stderr

# Setup the PicoBorg Reverse
PBR = PicoBorgRev.PicoBorgRev()
#PBR.i2cAddress = 0x44                  # Uncomment and change the value if you have changed the board address
PBR.Init()
if not PBR.foundChip:
    boards = PicoBorgRev.ScanForPicoBorgReverse()
    if len(boards) == 0:
        print 'No PicoBorg Reverse found, check you are attached :)'
    else:
        print 'No PicoBorg Reverse at address %02X, but we did find boards:' % (PBR.i2cAddress)
        for board in boards:
            print '    %02X (%d)' % (board, board)
        print 'If you need to change the I²C address change the setup line so it is correct, e.g.'
        print 'PBR.i2cAddress = 0x%02X' % (boards[0])
    sys.exit()
#PBR.SetEpoIgnore(True)                 # Uncomment to disable EPO latch, needed if you do not have a switch / jumper
# Ensure the communications failsafe has been enabled!
failsafe = False
for i in range(5):
    PBR.SetCommsFailsafe(True)
    failsafe = PBR.GetCommsFailsafe()
    if failsafe:
        break
if not failsafe:
    print 'Board %02X failed to report in failsafe mode!' % (PBR.i2cAddress)
    sys.exit()
PBR.ResetEpo()

# Settings for the joystick
axisUpDown = 1                          # Joystick axis to read for up / down position
axisUpDownInverted = False              # Set this to True if up and down appear to be swapped
axisLeftRight = 2                       # Joystick axis to read for left / right position
axisLeftRightInverted = False           # Set this to True if left and right appear to be swapped
buttonResetEpo = 3                      # Joystick button number to perform an EPO reset (Start)
buttonSlow = 8                          # Joystick button number for driving slowly whilst held (L2)
slowFactor = 0.5                        # Speed to slow to when the drive slowly button is held, e.g. 0.5 would be half speed
buttonFastTurn = 9                      # Joystick button number for turning fast (R2)
interval = 0.00                         # Time between updates in seconds, smaller responds faster but uses more processor time

# Power settings
voltageIn = 12.0                        # Total battery voltage to the PicoBorg Reverse
voltageOut = 12.0 * 0.95                # Maximum motor voltage, we limit it to 95% to allow the RPi to get uninterrupted power

# Setup the power limits
if voltageOut > voltageIn:
    maxPower = 1.0
else:
    maxPower = voltageOut / float(voltageIn)

# Setup pygame and wait for the joystick to become available
PBR.MotorsOff()
os.environ["SDL_VIDEODRIVER"] = "dummy" # Removes the need to have a GUI window
pygame.init()
pygame.display.set_mode((1,1))
print 'Waiting for joystick... (press CTRL+C to abort)'
while True:
    try:
        try:
            pygame.joystick.init()
            # Attempt to setup the joystick
            if pygame.joystick.get_count() < 1:
                # No joystick attached, toggle the LED
                PBR.SetLed(not PBR.GetLed())
                pygame.joystick.quit()
                time.sleep(0.5)
            else:
                # We have a joystick, attempt to initialise it!
                joystick = pygame.joystick.Joystick(0)
                break
        except pygame.error:
            # Failed to connect to the joystick, toggle the LED
            PBR.SetLed(not PBR.GetLed())
            pygame.joystick.quit()
            time.sleep(0.5)
    except KeyboardInterrupt:
        # CTRL+C exit, give up
        print '\nUser aborted'
        PBR.SetLed(True)
        sys.exit()
print 'Joystick found'
joystick.init()
PBR.SetLed(False)

try:
    print 'Press CTRL+C to quit'
    driveLeft = 0.0
    driveRight = 0.0
    running = True
    hadEvent = False
    upDown = 0.0
    leftRight = 0.0
    # Loop indefinitely
    while running:
        # Get the latest events from the system
        hadEvent = False
        events = pygame.event.get()
        # Handle each event individually
        for event in events:
            if event.type == pygame.QUIT:
                # User exit
                running = False
            elif event.type == pygame.JOYBUTTONDOWN:
                # A button on the joystick just got pushed down
                hadEvent = True
            elif event.type == pygame.JOYAXISMOTION:
                # A joystick has been moved
                hadEvent = True
            if hadEvent:
                # Read axis positions (-1 to +1)
                if axisUpDownInverted:
                    upDown = -joystick.get_axis(axisUpDown)
                else:
                    upDown = joystick.get_axis(axisUpDown)
                if axisLeftRightInverted:
                    leftRight = -joystick.get_axis(axisLeftRight)
                else:
                    leftRight = joystick.get_axis(axisLeftRight)
                # Apply steering speeds
                if not joystick.get_button(buttonFastTurn):
                    leftRight *= 0.5
                # Determine the drive power levels
                driveLeft = -upDown
                driveRight = -upDown
                if leftRight < -0.05:
                    # Turning left
                    driveLeft *= 1.0 + (2.0 * leftRight)
                elif leftRight > 0.05:
                    # Turning right
                    driveRight *= 1.0 - (2.0 * leftRight)
                # Check for button presses
                if joystick.get_button(buttonResetEpo):
                    PBR.ResetEpo()
                if joystick.get_button(buttonSlow):
                    driveLeft *= slowFactor
                    driveRight *= slowFactor
                # Set the motors to the new speeds
                PBR.SetMotor1(driveRight * maxPower)
                PBR.SetMotor2(-driveLeft * maxPower)
        # Change the LED to reflect the status of the EPO latch
        PBR.SetLed(PBR.GetEpo())
        # Wait for the interval period
        time.sleep(interval)
    # Disable all drives
    PBR.MotorsOff()
except KeyboardInterrupt:
    # CTRL+C exit, disable all drives
    PBR.MotorsOff()
print
diddyRedFollowBall.py
#!/usr/bin/env python
# coding: Latin-1

# Load library functions we want
import time
import os
import sys
import PicoBorgRev
import io
import threading
import picamera
import picamera.array
import cv2
import numpy

# Re-direct our output to standard error, we need to ignore standard out to hide some nasty print statements from pygame
sys.stdout = sys.stderr
print 'Libraries loaded'

# Global values
global running
global PBR
global camera
global processor
running = True

# Setup the PicoBorg Reverse
PBR = PicoBorgRev.PicoBorgRev()
#PBR.i2cAddress = 0x44                  # Uncomment and change the value if you have changed the board address
PBR.Init()
if not PBR.foundChip:
    boards = PicoBorgRev.ScanForPicoBorgReverse()
    if len(boards) == 0:
        print 'No PicoBorg Reverse found, check you are attached :)'
    else:
        print 'No PicoBorg Reverse at address %02X, but we did find boards:' % (PBR.i2cAddress)
        for board in boards:
            print '    %02X (%d)' % (board, board)
        print 'If you need to change the I²C address change the setup line so it is correct, e.g.'
        print 'PBR.i2cAddress = 0x%02X' % (boards[0])
    sys.exit()
#PBR.SetEpoIgnore(True)                 # Uncomment to disable EPO latch, needed if you do not have a switch / jumper
# Ensure the communications failsafe has been enabled!
failsafe = False
for i in range(5):
    PBR.SetCommsFailsafe(True)
    failsafe = PBR.GetCommsFailsafe()
    if failsafe:
        break
if not failsafe:
    print 'Board %02X failed to report in failsafe mode!' % (PBR.i2cAddress)
    sys.exit()
PBR.ResetEpo()

# Power settings
voltageIn = 12.0                        # Total battery voltage to the PicoBorg Reverse
voltageOut = 12.0 * 0.95                # Maximum motor voltage, we limit it to 95% to allow the RPi to get uninterrupted power

# Camera settings
imageWidth  = 320                       # Camera image width
imageHeight = 240                       # Camera image height
frameRate = 3                           # Camera image capture frame rate

# Auto drive settings
autoMaxPower = 1.0                      # Maximum output in automatic mode
autoMinPower = 0.2                      # Minimum output in automatic mode
autoMinArea = 10                        # Smallest target to move towards
autoMaxArea = 10000                     # Largest target to move towards
autoFullSpeedArea = 300                 # Target size at which we use the maximum allowed output

# Setup the power limits
if voltageOut > voltageIn:
    maxPower = 1.0
else:
    maxPower = voltageOut / float(voltageIn)
autoMaxPower *= maxPower

# Image stream processing thread
class StreamProcessor(threading.Thread):
    def __init__(self):
        super(StreamProcessor, self).__init__()
        self.stream = picamera.array.PiRGBArray(camera)
        self.event = threading.Event()
        self.terminated = False
        self.start()
        self.begin = 0

    def run(self):
        # This method runs in a separate thread
        while not self.terminated:
            # Wait for an image to be written to the stream
            if self.event.wait(1):
                try:
                    # Read the image and do some processing on it
                    self.stream.seek(0)
                    self.ProcessImage(self.stream.array)
                finally:
                    # Reset the stream and event
                    self.stream.seek(0)
                    self.stream.truncate()
                    self.event.clear()

    # Image processing function
    def ProcessImage(self, image):
        # Get the red section of the image
        image = cv2.medianBlur(image, 5)
        image = cv2.cvtColor(image, cv2.COLOR_RGB2HSV) # Swaps the red and blue channels!
        red = cv2.inRange(image, numpy.array((115, 127, 64)), numpy.array((125, 255, 255)))
        # Find the contours
        contours,hierarchy = cv2.findContours(red, cv2.RETR_LIST, cv2.CHAIN_APPROX_SIMPLE)
        # Go through each contour
        foundArea = -1
        foundX = -1
        foundY = -1
        for contour in contours:
            x,y,w,h = cv2.boundingRect(contour)
            cx = x + (w / 2)
            cy = y + (h / 2)
            area = w * h
            if foundArea < area:
                foundArea = area
                foundX = cx
                foundY = cy
        if foundArea > 0:
            ball = [foundX, foundY, foundArea]
        else:
            ball = None
        # Set drives or report ball status
        self.SetSpeedFromBall(ball)

    # Set the motor speed from the ball position
    def SetSpeedFromBall(self, ball):
        global PBR
        driveLeft  = 0.0
        driveRight = 0.0
        if ball:
            x = ball[0]
            area = ball[2]
            if area < autoMinArea:
                print 'Too small / far'
            elif area > autoMaxArea:
                print 'Close enough'
            else:
                if area < autoFullSpeedArea:
                    speed = 1.0
                else:
                    speed = 1.0 / (area / autoFullSpeedArea)
                speed *= autoMaxPower - autoMinPower
                speed += autoMinPower
                direction = (x - imageCentreX) / imageCentreX
                if direction < 0.0:
                    # Turn right
                    driveLeft  = speed
                    driveRight = speed * (1.0 + direction)
                else:
                    # Turn left
                    driveLeft  = speed * (1.0 - direction)
                    driveRight = speed
                print '%.2f, %.2f' % (driveLeft, driveRight)
        else:
            print 'No ball'
        PBR.SetMotor1(driveRight)
        PBR.SetMotor2(-driveLeft)

# Image capture thread
class ImageCapture(threading.Thread):
    def __init__(self):
        super(ImageCapture, self).__init__()
        self.start()

    def run(self):
        global camera
        global processor
        print 'Start the stream using the video port'
        camera.capture_sequence(self.TriggerStream(), format='bgr', use_video_port=True)
        print 'Terminating camera processing...'
        processor.terminated = True
        processor.join()
        print 'Processing terminated.'

    # Stream delegation loop
    def TriggerStream(self):
        global running
        while running:
            if processor.event.is_set():
                time.sleep(0.01)
            else:
                yield processor.stream
                processor.event.set()

# Startup sequence
print 'Setup camera'
camera = picamera.PiCamera()
camera.resolution = (imageWidth, imageHeight)
camera.framerate = frameRate
imageCentreX = imageWidth / 2.0
imageCentreY = imageHeight / 2.0

print 'Setup the stream processing thread'
processor = StreamProcessor()

print 'Wait ...'
time.sleep(2)
captureThread = ImageCapture()

try:
    print 'Press CTRL+C to quit'
    PBR.MotorsOff()
    # Loop indefinitely
    while running:
        # Change the LED to reflect the status of the EPO latch
        # We do this regularly to keep the communications failsafe test happy
        PBR.SetLed(PBR.GetEpo())
        # Wait for the interval period
        time.sleep(0.1)
    # Disable all drives
    PBR.MotorsOff()
except KeyboardInterrupt:
    # CTRL+C exit, disable all drives
    print '\nUser shutdown'
    PBR.MotorsOff()
except:
    # Unexpected error, shut down!
    e = sys.exc_info()[0]
    print
    print e
    print '\nUnexpected error, shutting down!'
    PBR.MotorsOff()
# Tell each thread to stop, and wait for them to end
running = False
captureThread.join()
processor.terminated = True
processor.join()
del camera
PBR.SetLed(True)
print 'Program terminated.'
diddyRedJoyBall.py
#!/usr/bin/env python
# coding: Latin-1

# Load library functions we want
import time
import os
import sys
import pygame
import PicoBorgRev
import io
import threading
import picamera
import picamera.array
import cv2
import numpy

# Re-direct our output to standard error, we need to ignore standard out to hide some nasty print statements from pygame
sys.stdout = sys.stderr
print 'Libraries loaded'

# Global values
global autoMode
global running
global PBR
global camera
global controllerLost
global processingPool
global lock
autoMode = False
running = True
controllerLost = False
processingPool = []
lock = threading.Lock()

# Setup the PicoBorg Reverse
PBR = PicoBorgRev.PicoBorgRev()
#PBR.i2cAddress = 0x44                  # Uncomment and change the value if you have changed the board address
PBR.Init()
if not PBR.foundChip:
    boards = PicoBorgRev.ScanForPicoBorgReverse()
    if len(boards) == 0:
        print 'No PicoBorg Reverse found, check you are attached :)'
    else:
        print 'No PicoBorg Reverse at address %02X, but we did find boards:' % (PBR.i2cAddress)
        for board in boards:
            print '    %02X (%d)' % (board, board)
        print 'If you need to change the I²C address change the setup line so it is correct, e.g.'
        print 'PBR.i2cAddress = 0x%02X' % (boards[0])
    sys.exit()
#PBR.SetEpoIgnore(True)                 # Uncomment to disable EPO latch, needed if you do not have a switch / jumper
# Ensure the communications failsafe has been enabled!
failsafe = False
for i in range(5):
    PBR.SetCommsFailsafe(True)
    failsafe = PBR.GetCommsFailsafe()
    if failsafe:
        break
if not failsafe:
    print 'Board %02X failed to report in failsafe mode!' % (PBR.i2cAddress)
    sys.exit()
PBR.ResetEpo()

# Settings for the joystick
axisUpDown = 1                          # Joystick axis to read for up / down position
axisUpDownInverted = False              # Set this to True if up and down appear to be swapped
axisLeftRight = 2                       # Joystick axis to read for left / right position
axisLeftRightInverted = False           # Set this to True if left and right appear to be swapped
buttonResetEpo = 3                      # Joystick button number to perform an EPO reset (Start)
buttonSlow = 8                          # Joystick button number for driving slowly whilst held (L2)
slowFactor = 0.5                        # Speed to slow to when the drive slowly button is held, e.g. 0.5 would be half speed
buttonFastTurn = 9                      # Joystick button number for turning fast (R2)
interval = 0.02                         # Time between updates in seconds, smaller responds faster but uses more processor time
controllerLostLoops = 20                # Number of loops without any joystick events before announcing the joystick as out of range
buttonSetAutoMode = 4                   # Joystick button number to enable automatic control (D-Pad UP)
buttonSetManualMode = 6                 # Joystick button number to enable manual control (D-Pad DOWN)

# Power settings
voltageIn = 12.0                        # Total battery voltage to the PicoBorg Reverse
voltageOut = 12.0 * 0.95                # Maximum motor voltage, we limit it to 95% to allow the RPi to get uninterrupted power

# Camera settings
imageWidth  = 320                       # Camera image width
imageHeight = 240                       # Camera image height
threadCount = 8                         # Number of image processing threads to run
frameRate = 30                          # Camera image capture frame rate

# Auto drive settings
autoMaxPower = 1.0                      # Maximum output in automatic mode
autoMinPower = 0.2                      # Minimum output in automatic mode
autoMinArea = 10                        # Smallest target to move towards
autoMaxArea = 30000                     # Largest target to move towards
autoFullSpeedArea = 1000                # Target size at which we use the maximum allowed output

# Setup the power limits
if voltageOut > voltageIn:
    maxPower = 1.0
else:
    maxPower = voltageOut / float(voltageIn)
autoMaxPower *= maxPower

# Image stream processing thread
class StreamProcessor(threading.Thread):
    def __init__(self):
        super(StreamProcessor, self).__init__()
        self.stream = picamera.array.PiRGBArray(camera)
        self.event = threading.Event()
        self.terminated = False
        self.start()
        self.begin = 0

    def run(self):
        # This method runs in a separate thread
        global processingPool
        global lock
        while not self.terminated:
            # Wait for an image to be written to the stream
            if self.event.wait(1):
                try:
                    # Read the image and do some processing on it
                    self.stream.seek(0)
                    self.ProcessImage(self.stream.array)
                finally:
                    # Reset the stream and event
                    self.stream.seek(0)
                    self.stream.truncate()
                    self.event.clear()
                    # Return ourselves to the processing pool
                    with lock:
                        processingPool.append(self)

    # Image processing function
    def ProcessImage(self, image):
        global autoMode
        # Get the red section of the image
        image = cv2.medianBlur(image, 5)
        image = cv2.cvtColor(image, cv2.COLOR_RGB2HSV) # Swaps the red and blue channels!
        red = cv2.inRange(image, numpy.array((115, 127, 64)), numpy.array((125, 255, 255)))
        # Find the contours
        contours,hierarchy = cv2.findContours(red, cv2.RETR_LIST, cv2.CHAIN_APPROX_SIMPLE)
        # Go through each contour
        foundArea = -1
        foundX = -1
        foundY = -1
        for contour in contours:
            x,y,w,h = cv2.boundingRect(contour)
            cx = x + (w / 2)
            cy = y + (h / 2)
            area = w * h
            if foundArea < area:
                foundArea = area
                foundX = cx
                foundY = cy
        if foundArea > 0:
            ball = [foundX, foundY, foundArea]
        else:
            ball = None
        # Set drives or report ball status
        if autoMode:
            self.SetSpeedFromBall(ball)
        else:
            if ball:
                print 'Ball at %d,%d (%d)' % (foundX, foundY, foundArea)
            else:
                print 'No ball'

    # Set the motor speed from the ball position
    def SetSpeedFromBall(self, ball):
        global PBR
        global controllerLost
        driveLeft  = 0.0
        driveRight = 0.0
        if ball:
            x = ball[0]
            area = ball[2]
            if area < autoMinArea:
                print '<Too small / far>'
            elif area > autoMaxArea:
                print '<Close enough>'
            else:
                if area < autoFullSpeedArea:
                    speed = 1.0
                else:
                    speed = 1.0 / (area / autoFullSpeedArea)
                speed *= autoMaxPower - autoMinPower
                speed += autoMinPower
                direction = (x - imageCentreX) / imageCentreX
                if direction < 0.0:
                    # Turn right
                    driveLeft  = speed
                    driveRight = speed * (1.0 + direction)
                else:
                    # Turn left
                    driveLeft  = speed * (1.0 - direction)
                    driveRight = speed
                print '<%.2f, %.2f>' % (driveLeft, driveRight)
        else:
            print '<No ball>'
        if controllerLost:
            print '<Waiting for lost controller...>'
        else:
            PBR.SetMotor1(driveRight)
            PBR.SetMotor2(-driveLeft)

# Image capture thread
class ImageCapture(threading.Thread):
    def __init__(self):
        super(ImageCapture, self).__init__()
        self.start()

    def run(self):
        global camera
        global processingPool
        print 'Start the stream using the video port'
        camera.capture_sequence(self.TriggerStream(), format='bgr', use_video_port=True)
        print 'Terminating camera processing...'
        while processingPool:
            with lock:
                processor = processingPool.pop()
            processor.terminated = True
            processor.join()
        print 'Processing terminated.'

    # Stream delegation loop
    def TriggerStream(self):
        global running
        global processingPool
        while running:
            # Get the next available processing thread
            with lock:
                if processingPool:
                    processor = processingPool.pop()
                else:
                    processor = None
            if processor:
                # We have a thread, pass it the next frame when ready
                yield processor.stream
                processor.event.set()
            else:
                # No threads are ready, wait a while then try again
                time.sleep(0.01)

# Startup sequence
print 'Setup camera'
camera = picamera.PiCamera()
camera.resolution = (imageWidth, imageHeight)
camera.framerate = frameRate
imageCentreX = imageWidth / 2.0
imageCentreY = imageHeight / 2.0

print 'Setup the stream processing threads'
processingPool = [StreamProcessor() for i in range(threadCount)]

print 'Wait ...'
time.sleep(2)
captureThread = ImageCapture()

# Setup pygame and wait for the joystick to become available
PBR.MotorsOff()
os.environ["SDL_VIDEODRIVER"] = "dummy" # Removes the need to have a GUI window
pygame.init()
pygame.display.set_mode((1,1))
print 'Waiting for joystick... (press CTRL+C to abort)'
while True:
    try:
        try:
            pygame.joystick.init()
            # Attempt to setup the joystick
            if pygame.joystick.get_count() < 1:
                # No joystick attached, toggle the LED
                PBR.SetLed(not PBR.GetLed())
                pygame.joystick.quit()
                time.sleep(0.5)
            else:
                # We have a joystick, attempt to initialise it!
                joystick = pygame.joystick.Joystick(0)
                break
        except pygame.error:
            # Failed to connect to the joystick, toggle the LED
            PBR.SetLed(not PBR.GetLed())
            pygame.joystick.quit()
            time.sleep(0.5)
    except KeyboardInterrupt:
        # CTRL+C exit, give up
        print '\nUser aborted'
        PBR.SetLed(True)
        sys.exit()
print 'Joystick found'
joystick.init()
PBR.SetLed(False)

try:
    print 'Press CTRL+C to quit'
    driveLeft = 0.0
    driveRight = 0.0
    hadEvent = False
    upDown = 0.0
    leftRight = 0.0
    loopsWithoutEvent = 0
    # Loop indefinitely
    while running:
        # Get the latest events from the system
        hadEvent = False
        events = pygame.event.get()
        # Handle each event individually
        for event in events:
            if event.type == pygame.QUIT:
                # User exit
                running = False
            elif event.type == pygame.JOYBUTTONDOWN:
                # A button on the joystick just got pushed down
                hadEvent = True
            elif event.type == pygame.JOYAXISMOTION:
                # A joystick has been moved
                hadEvent = True
            if hadEvent:
                if joystick.get_button(buttonSetAutoMode):
                    autoMode = True
                if joystick.get_button(buttonSetManualMode):
                    autoMode = False
                if not autoMode:
                    # Read axis positions (-1 to +1)
                    if axisUpDownInverted:
                        upDown = -joystick.get_axis(axisUpDown)
                    else:
                        upDown = joystick.get_axis(axisUpDown)
                    if axisLeftRightInverted:
                        leftRight = -joystick.get_axis(axisLeftRight)
                    else:
                        leftRight = joystick.get_axis(axisLeftRight)
                    # Apply steering speeds
                    if not joystick.get_button(buttonFastTurn):
                        leftRight *= 0.5
                    # Determine the drive power levels
                    driveLeft = -upDown
                    driveRight = -upDown
                    if leftRight < -0.05:
                        # Turning left
                        driveLeft *= 1.0 + (2.0 * leftRight)
                    elif leftRight > 0.05:
                        # Turning right
                        driveRight *= 1.0 - (2.0 * leftRight)
                    # Check for button presses
                    if joystick.get_button(buttonResetEpo):
                        PBR.ResetEpo()
                    if joystick.get_button(buttonSlow):
                        driveLeft *= slowFactor
                        driveRight *= slowFactor
                    # Set the motors to the new speeds
                    PBR.SetMotor1(driveRight * maxPower)
                    PBR.SetMotor2(-driveLeft * maxPower)
        if hadEvent:
            # Reset the controller lost counter
            loopsWithoutEvent = 0
            if controllerLost:
                # We had lost the controller, we have now found it again
                if autoMode:
                    print 'Controller re-connected, auto-motion will resume'
                else:
                    print 'Controller re-connected, move joystick to resume operation'
                PBR.SetLed(False)
                controllerLost = False
        elif controllerLost:
            # Controller has been lost, pulse the LED at a regular loop count
            loopsWithoutEvent += 1
            if (loopsWithoutEvent % (controllerLostLoops / 10)) == 0:
                PBR.SetLed(not PBR.GetLed())
                # Attempt to reset the joystick module
                del joystick
                pygame.joystick.quit()
                pygame.joystick.init()
                if pygame.joystick.get_count() < 1:
                    # Controller has been disconnected, poll for reconnection
                    print 'Controller disconnected!'
                    while pygame.joystick.get_count() < 1:
                        time.sleep(interval * (controllerLostLoops / 10))
                        pygame.joystick.quit()
                        pygame.joystick.init()
                        PBR.SetLed(not PBR.GetLed())
                # Grab the joystick again
                joystick = pygame.joystick.Joystick(0)
                joystick.init()
                continue
            # Skip to the next loop after the interval
            time.sleep(interval)
            continue
        else:
            # No events this loop, check if it has been too long since we saw an event
            loopsWithoutEvent += 1
            if loopsWithoutEvent > controllerLostLoops:
                # It has been too long, disable control!
                print 'Controller lost!'
                PBR.MotorsOff()
                PBR.SetLed(True)
                controllerLost = True
                # Skip to the next loop after the interval
                time.sleep(interval)
                continue
        # Change the LED to reflect the status of the EPO latch
        PBR.SetLed(PBR.GetEpo())
        # Wait for the interval period
        time.sleep(interval)
    # Disable all drives
    PBR.MotorsOff()
except KeyboardInterrupt:
    # CTRL+C exit, disable all drives
    print '\nUser shutdown'
    PBR.MotorsOff()
except:
    # Unexpected error, shut down!
    e = sys.exc_info()[0]
    print
    print e
    print '\nUnexpected error, shutting down!'
    PBR.MotorsOff()
# Tell each thread to stop, and wait for them to end
running = False
captureThread.join()
while processingPool:
    with lock:
        processor = processingPool.pop()
    processor.terminated = True
    processor.join()
del camera
PBR.SetLed(True)
print 'Program terminated.'