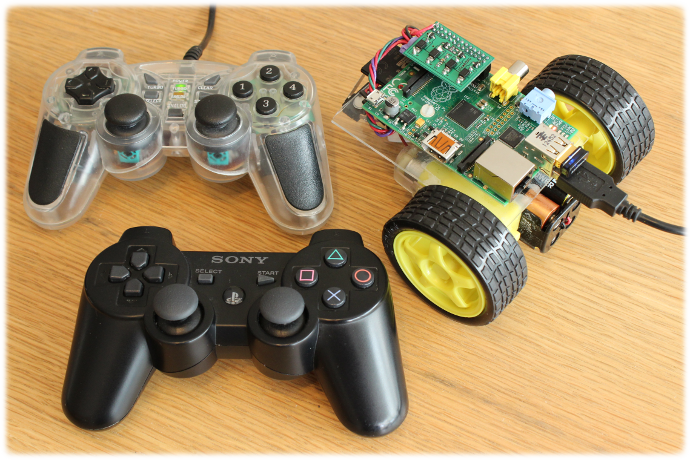
JoyBorg - Control your PicoBorg robot with a joystick
We controlled our PicoBorg from a remote keyboard control previously using RemoteKeyBorg, but what about using a joystick or gamepad instead?

Well it seems like a good idea to us, so we thought we would make an example to get you going.
This example will work with either a wired or wireless joystick, as long as the Raspberry Pi can see the joystick properly.
First plug the joystick into Raspberry Pi, this will be into a USB port from either the joysticks cable, or the wireless receiver.
You will now need to run the following to ensure the joystick drivers are installed:
Then you will want to run jstest as follows:
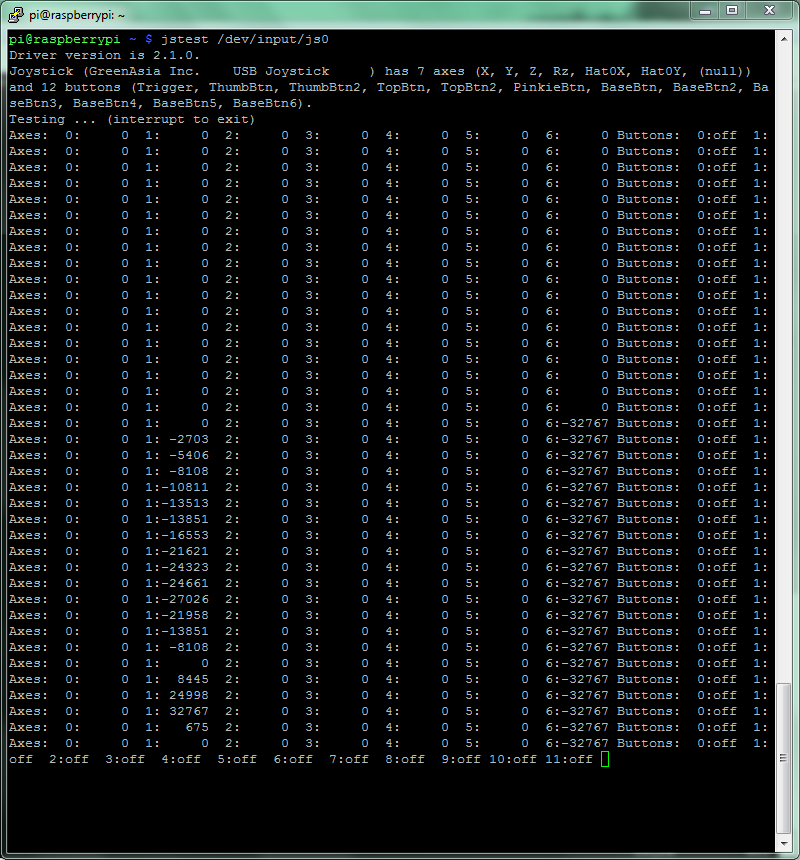
If you wiggle one of the analogue sticks up and down you should see output like:

In this case we can see axis 1 is moving, so that is our up/down axis, do the same thing for a left/right movement (they can be the same stick or different, which ever you prefer) and make a note of both numbers.
For those of you trying to get a PS3 controller to work, you will need a bluetooth dongle that the Raspberry Pi is happy with, and the process is a bit more involved.
We followed the guide here to get the PS3 controller to work properly, the axis numbers for the joysticks are:
Now we have a working joystick, we need to download the script code:
Open JoyBorg.py in a text editor, e.g.
On line 33,
If up / down seems to be swapped, change line 34 to read
On line 35,
If left / right seems to be swapped, change line 36 to read
Now we are all ready, run the script using:
gksudo is needed to run as sudo (so we can control GPIO pins) and so we can make a window on the screen, which we do for pygame's benefit.
If you get a window popup warning about "Granted permissions without asking for password" it is safe to ignore it, it is just warning you that the window was started with root permissions.
You can download JoyBorg.py as text here.

Well it seems like a good idea to us, so we thought we would make an example to get you going.
This example will work with either a wired or wireless joystick, as long as the Raspberry Pi can see the joystick properly.
Connecting the joystick to the Raspberry Pi
First plug the joystick into Raspberry Pi, this will be into a USB port from either the joysticks cable, or the wireless receiver.
You will now need to run the following to ensure the joystick drivers are installed:
sudo apt-get -y install joystickThen you will want to run jstest as follows:
jstest /dev/input/js0If you wiggle one of the analogue sticks up and down you should see output like:

In this case we can see axis 1 is moving, so that is our up/down axis, do the same thing for a left/right movement (they can be the same stick or different, which ever you prefer) and make a note of both numbers.
For those of you trying to get a PS3 controller to work, you will need a bluetooth dongle that the Raspberry Pi is happy with, and the process is a bit more involved.
We followed the guide here to get the PS3 controller to work properly, the axis numbers for the joysticks are:
- Left stick left/right: 0
- Left stick up/down: 1
- Right stick left/right: 2
- Right stick up/down: 3
Get the script running
Now we have a working joystick, we need to download the script code:
cd ~
wget -O JoyBorg.py http://www.piborg.org/downloads/JoyBorg.txt
chmod +x JoyBorg.py
However we will also need to change the settings (those numbers you remembered earlier).
Open JoyBorg.py in a text editor, e.g.
nano JoyBorg.pyOn line 33,
axisUpDown should be changed to the first number you noted earlier, e.g. axisUpDown = 0 if 0 is the axis which changed when moving up and down.If up / down seems to be swapped, change line 34 to read
axisUpDownInverted = True instead.On line 35,
axisLeftRight should be changed to the second number you noted earlier, e.g. axisLeftRight = 1 if 1 is the axis which changed when moving left and right.If left / right seems to be swapped, change line 36 to read
axisLeftRightInverted = True instead.Now we are all ready, run the script using:
gksudo ~/JoyBorg.pygksudo is needed to run as sudo (so we can control GPIO pins) and so we can make a window on the screen, which we do for pygame's benefit.
If you get a window popup warning about "Granted permissions without asking for password" it is safe to ignore it, it is just warning you that the window was started with root permissions.
The source
You can download JoyBorg.py as text here.
#!/usr/bin/env python
# coding: Latin-1

# Load library functions we want
import time
import pygame
import RPi.GPIO as GPIO
GPIO.setmode(GPIO.BCM)
GPIO.setwarnings(False)

# Set which GPIO pins the drive outputs are connected to
DRIVE_1 = 4
DRIVE_2 = 18
DRIVE_3 = 8
DRIVE_4 = 7

# Set all of the drive pins as output pins
GPIO.setup(DRIVE_1, GPIO.OUT)
GPIO.setup(DRIVE_2, GPIO.OUT)
GPIO.setup(DRIVE_3, GPIO.OUT)
GPIO.setup(DRIVE_4, GPIO.OUT)

# Function to set all drives off
def MotorOff():
    GPIO.output(DRIVE_1, GPIO.LOW)
    GPIO.output(DRIVE_2, GPIO.LOW)
    GPIO.output(DRIVE_3, GPIO.LOW)
    GPIO.output(DRIVE_4, GPIO.LOW)

# Settings for JoyBorg
leftDrive = DRIVE_1                     # Drive number for left motor
rightDrive = DRIVE_4                    # Drive number for right motor
axisUpDown = 1                          # Joystick axis to read for up / down position
axisUpDownInverted = False              # Set this to True if up and down appear to be swapped
axisLeftRight = 3                       # Joystick axis to read for left / right position
axisLeftRightInverted = False           # Set this to True if left and right appear to be swapped
interval = 0.1                          # Time between keyboard updates in seconds, smaller responds faster but uses more processor time

# Setup pygame and key states
global hadEvent
global moveUp
global moveDown
global moveLeft
global moveRight
global moveQuit
hadEvent = True
moveUp = False
moveDown = False
moveLeft = False
moveRight = False
moveQuit = False
pygame.init()
pygame.joystick.init()
joystick = pygame.joystick.Joystick(0)
joystick.init()
screen = pygame.display.set_mode([300,300])
pygame.display.set_caption("JoyBorg - Press [ESC] to quit")

# Function to handle pygame events
def PygameHandler(events):
    # Variables accessible outside this function
    global hadEvent
    global moveUp
    global moveDown
    global moveLeft
    global moveRight
    global moveQuit
    # Handle each event individually
    for event in events:
        if event.type == pygame.QUIT:
            # User exit
            hadEvent = True
            moveQuit = True
        elif event.type == pygame.KEYDOWN:
            # A key has been pressed, see if it is one we want
            hadEvent = True
            if event.key == pygame.K_ESCAPE:
                moveQuit = True
        elif event.type == pygame.KEYUP:
            # A key has been released, see if it is one we want
            hadEvent = True
            if event.key == pygame.K_ESCAPE:
                moveQuit = False
        elif event.type == pygame.JOYAXISMOTION:
            # A joystick has been moved, read axis positions (-1 to +1)
            hadEvent = True
            upDown = joystick.get_axis(axisUpDown)
            leftRight = joystick.get_axis(axisLeftRight)
            # Invert any axes which are incorrect
            if axisUpDownInverted:
                upDown = -upDown
            if axisLeftRightInverted:
                leftRight = -leftRight
            # Determine Up / Down values
            if upDown < -0.1:
                moveUp = True
                moveDown = False
            elif upDown > 0.1:
                moveUp = False
                moveDown = True
            else:
                moveUp = False
                moveDown = False
            # Determine Left / Right values
            if leftRight < -0.1:
                moveLeft = True
                moveRight = False
            elif leftRight > 0.1:
                moveLeft = False
                moveRight = True
            else:
                moveLeft = False
                moveRight = False
try:
    print 'Press [ESC] to quit'
    # Loop indefinitely
    while True:
        # Get the currently pressed keys on the keyboard
        PygameHandler(pygame.event.get())
        if hadEvent:
            # Keys have changed, generate the command list based on keys
            hadEvent = False
            if moveQuit:
                break
            elif moveLeft:
                leftState = GPIO.LOW
                rightState = GPIO.HIGH
            elif moveRight:
                leftState = GPIO.HIGH
                rightState = GPIO.LOW
            elif moveUp:
                leftState = GPIO.HIGH
                rightState = GPIO.HIGH
            else:
                leftState = GPIO.LOW
                rightState = GPIO.LOW
            GPIO.output(leftDrive, leftState)
            GPIO.output(rightDrive, rightState)
        # Wait for the interval period
        time.sleep(interval)
    # Disable all drives
    MotorOff()
except KeyboardInterrupt:
    # CTRL+C exit, disable all drives
    MotorOff()


