LedBorg - An ultra bright RGB LED add on board for your Raspberry Pi
If you want to use the new LedBorg software which has driver free LedBorg scripts go here.
Installation
The table below contains all of the Linux distributions we currently provide packages for.If there is no package available for your distribution, there is the option to compile from source.
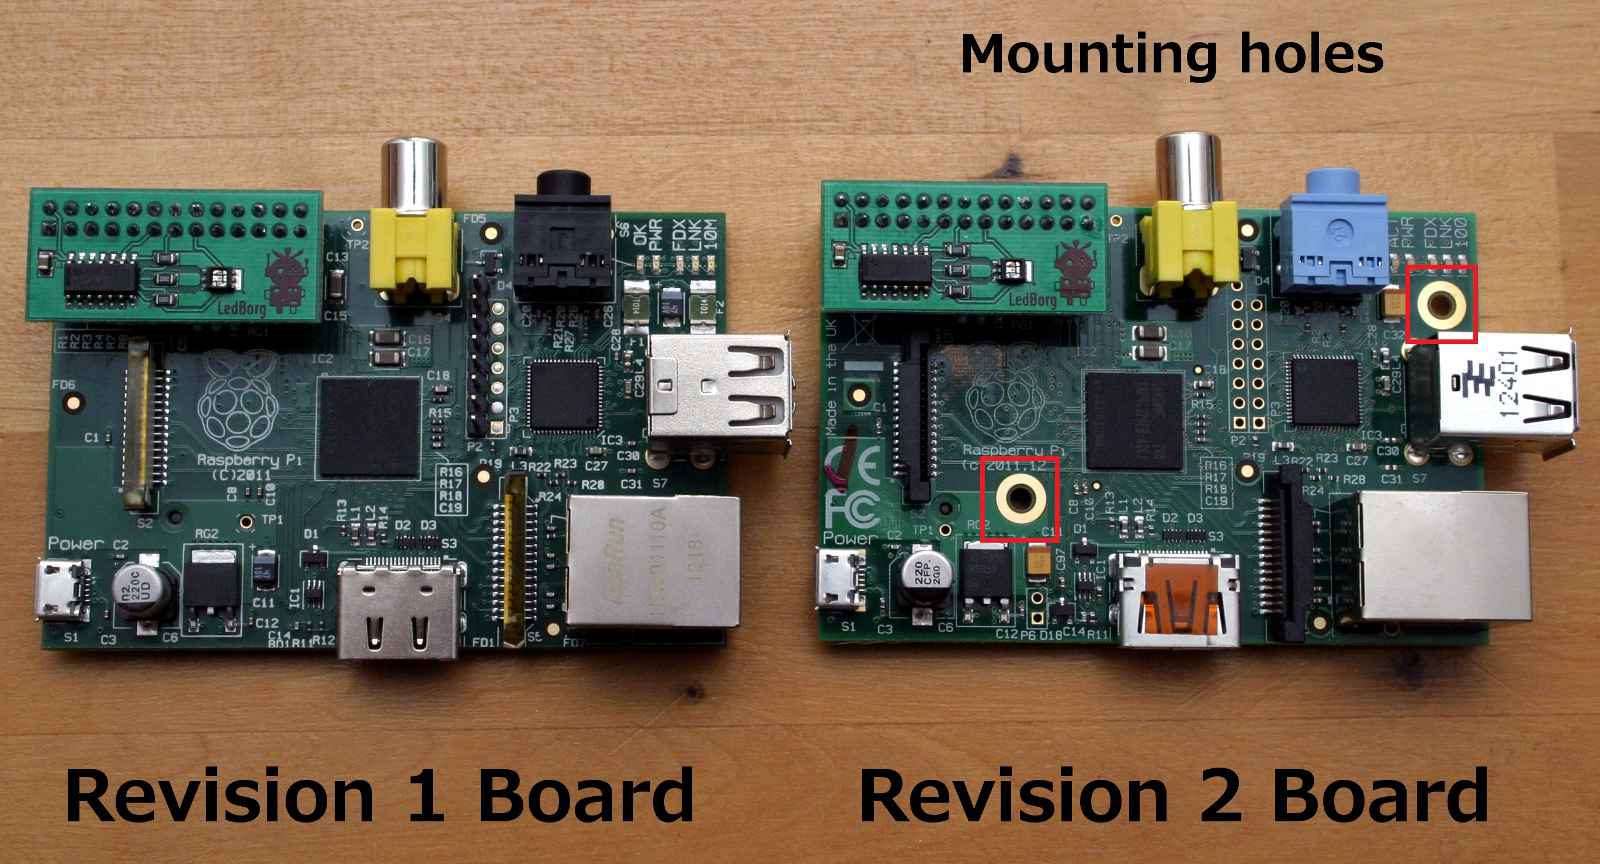
If you are unsure if you have a Revision 1 or Revision 2 Raspberry Pi, there is a simple way to tell.
The Revision 2 board comes with two mounting holes, one of which is next to the row of status LEDs on the Raspberry Pi.
If you choose the wrong revision download, your LedBorg will not work. This is due to a design change in the GPIO pins between revisions.
If you have a Model A board then you should use the Revision 2 downloads (the Model A can be distinguished by the lack of an Ethernet connector).
All installations need to be run from a terminal window and the commands needed are contained in the Readme files in the table below.
Packages
If you are unsure of your package, try running uname -r in a terminal window.Make sure you select the correct package for your Raspberry Pi and Linux distribution.
distribution |
board rev |
version |
version |
|
2013-05-25 2013-02-09 |
||||
2013-05-25 2013-02-09 |
||||
detail |
||||
detail |
Usage
Colour options
The colours on an LedBorg are set as levels of red, green and blue; referred to as RGBThe available levels are:
- 0 -> Means channel is off
- 1 -> Means channel is at 50%
- 2 -> Means channel is at 100%
RGB of 200 means that red is on full, green is off and blue is off, producing RED
RGB of 210 means that red is on full, green is on half and blue is off, producing ORANGE
RGB of 202 means that red is on full, green is off and blue is on full, producing MAGENTA
RGB of 021 means that red is off, green is on full and blue is on half, producing SPRING GREEN
RGB of 222 means that red is on full, green is on full and blue is on full, producing WHITE
RGB of 000 means that red is off, green is off and blue is off, since all are off this turns LedBorg off (pseudo black)
All colours against numbers:
| 100 | 200 | 211 | 110 | 220 | 221 | 000 | 111 | 222 |
| 010 | 020 | 121 | 011 | 022 | 122 | 120 | 021 | 210 |
| 001 | 002 | 112 | 101 | 202 | 212 | 012 | 102 | 201 |
Controlling LedBorg
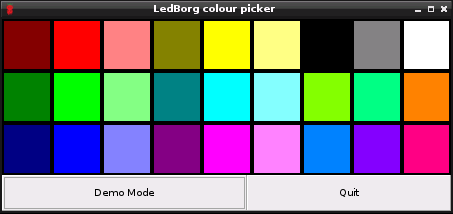
- To set the colour from the GUI:
- Find the GUI icon on the desktop where it will be called LedBorg with a PiBorg logo
Alternatively it can be found by browsing to /home/pi where it will be called ledborg_gui - Run the GUI by double-clicking on it
If a dialog box appears asking you what to do select Execute - Click on a box to change to the colour it shows
- You can click on Demo Mode to run example sequences, including turning LedBorg into a CPU usage meter!
- Find the GUI icon on the desktop where it will be called LedBorg with a PiBorg logo
- To set the colour from a Python script:
LedBorg = open('/dev/ledborg', 'w')
LedBorg.write('RGB')
del LedBorg
replacing RGB with the desired levels (see above) - To set the colour from a terminal type:
echo "RGB" > /dev/ledborg
replacing RGB with the desired levels (see above) - To set the colour from a terminal with the basic driver type:
~/ledborg-basic RGB
replacing RGB with the desired levels (see above), note that 50% options are not available to the basic driver and 100% will be used instead (only 8 colours including off) - To disable LedBorg from a terminal type:
sudo /etc/init.d/ledborg.sh stop
Note that this will free the GPIO pins for use, but will not affect if the LedBorg driver is started at boot time - To enable LedBorg from a terminal type:
sudo /etc/init.d/ledborg.sh start
Note that this will start using the GPIO pins, but will not affect if the LedBorg driver is started at boot time
Managing boot options
- To set the boot-up colour from a terminal type:
echo "RGB" > /home/pi/ledborg_bootcolour
replacing RGB with the desired levels (see above) - To stop LedBorg from auto-loading from a terminal type:
sudo update-rc.d ledborg.sh remove
Note that this will stop LedBorg using the GPIO pins during boot, however the enable LedBorg instructions above will be need to be used before trying to set a colour - To enable LedBorg auto-loading from a terminal type:
sudo update-rc.d ledborg.sh defaults 100
Note that this will start using the GPIO pins during boot, loading the colour specified by /home/pi/ledborg_bootcolour
Downloads
Raspbian
Rev 1, 2014-01-07 or 3.10.25+
mkdir ~/ledborg-setup
cd ~/ledborg-setup
wget -O setup.zip http://www.piborg.org/downloads/ledborg/raspbian-2014-01-07-rev1.zip
unzip setup.zip
chmod +x install.sh
./install.sh
Manual download rev1: http://www.piborg.org/downloads/ledborg/raspbian-2014-01-07-rev1.zip
Rev 1, 2013-09-10 or 3.6.11+ build #538
mkdir ~/ledborg-setup
cd ~/ledborg-setup
wget -O setup.zip http://www.piborg.org/downloads/ledborg/raspbian-2013-09-10-rev1.zip
unzip setup.zip
chmod +x install.sh
./install.sh
Manual download rev1: http://www.piborg.org/downloads/ledborg/raspbian-2013-09-10-rev1.zip
Rev 1, 2013-02-09 or 3.6.11+
mkdir ~/ledborg-setup
cd ~/ledborg-setup
wget -O setup.zip http://www.piborg.org/downloads/ledborg/raspbian-2013-02-09-rev1.zip
unzip setup.zip
chmod +x install.sh
./install.sh
Manual download rev1: http://www.piborg.org/downloads/ledborg/raspbian-2013-02-09-rev1.zip
Rev 1, 2012-10-28 or 2012-12-16 or 3.2.27+
mkdir ~/ledborg-setup
cd ~/ledborg-setup
wget -O setup.zip http://www.piborg.org/downloads/ledborg/raspbian-2012-10-28-rev1.zip
unzip setup.zip
chmod +x install.sh
./install.sh
Manual download rev1: http://www.piborg.org/downloads/ledborg/raspbian-2012-10-28-rev1.zip
Rev 1, 2012-08-16 or 3.1.9+
mkdir ~/ledborg-setup
cd ~/ledborg-setup
wget -O setup.zip http://www.piborg.org/downloads/ledborg/raspbian-2012-08-16-rev1.zip
unzip setup.zip
chmod +x install.sh
./install.sh
Manual download rev1: http://www.piborg.org/downloads/ledborg/raspbian-2012-08-16-rev1.zip
Rev 2, 2014-01-07 or 3.10.25+
mkdir ~/ledborg-setup
cd ~/ledborg-setup
wget -O setup.zip http://www.piborg.org/downloads/ledborg/raspbian-2014-01-07-rev2.zip
unzip setup.zip
chmod +x install.sh
./install.sh
Manual download rev2: http://www.piborg.org/downloads/ledborg/raspbian-2014-01-07-rev2.zip
Rev 2, 2013-09-10 or 3.6.11+ build #538
mkdir ~/ledborg-setup
cd ~/ledborg-setup
wget -O setup.zip http://www.piborg.org/downloads/ledborg/raspbian-2013-09-10-rev2.zip
unzip setup.zip
chmod +x install.sh
./install.sh
Manual download rev2: http://www.piborg.org/downloads/ledborg/raspbian-2013-09-10-rev2.zip
Rev 2, 2013-02-09 or 3.6.11+
mkdir ~/ledborg-setup
cd ~/ledborg-setup
wget -O setup.zip http://www.piborg.org/downloads/ledborg/raspbian-2013-02-09-rev2.zip
unzip setup.zip
chmod +x install.sh
./install.sh
Manual download rev2: http://www.piborg.org/downloads/ledborg/raspbian-2013-02-09-rev2.zip
Rev 2, 2012-10-28 or 2012-12-16 or 3.2.27+
mkdir ~/ledborg-setup
cd ~/ledborg-setup
wget -O setup.zip http://www.piborg.org/downloads/ledborg/raspbian-2012-10-28-rev2.zip
unzip setup.zip
chmod +x install.sh
./install.sh
Manual download rev2: http://www.piborg.org/downloads/ledborg/raspbian-2012-10-28-rev2.zip
Rev 2, 2012-08-16 or 3.1.9+
mkdir ~/ledborg-setup
cd ~/ledborg-setup
wget -O setup.zip http://www.piborg.org/downloads/ledborg/raspbian-2012-08-16-rev2.zip
unzip setup.zip
chmod +x install.sh
./install.sh
Manual download rev2: http://www.piborg.org/downloads/ledborg/raspbian-2012-08-16-rev2.zip
Raspbmc
Rev 1, RC5 or 3.6.7
To get at a terminal on Raspbmc go to the shutdown icon and choose exit, when the white screen shows press ESC.Due to difficulty building a kernel module from Raspbmc this binary is a basic driver only (user space), because of this it is only capable of channels being fully on or off, providing only 8 colours (including all off).
Please use the basic driver instructions when commanding from the terminal.
mkdir ~/ledborg-setup-basic
cd ~/ledborg-setup-basic
wget -O setup.zip http://www.piborg.org/downloads/ledborg/raspbmc-rc5-basic-rev1.zip
sudo apt-get install unzip
unzip setup.zip
chmod +x install.sh
./install.sh
Manual download rev1: http://www.piborg.org/downloads/ledborg/raspbmc-rc5-basic-rev1.zip
Rev 2, RC5 or 3.6.7
To get at a terminal on Raspbmc go to the shutdown icon and choose exit, when the white screen shows press ESC.Due to difficulty building a kernel module from Raspbmc this binary is a basic driver only (user space), because of this it is only capable of channels being fully on or off, providing only 8 colours (including all off).
Please use the basic driver instructions when commanding from the terminal.
mkdir ~/ledborg-setup-basic
cd ~/ledborg-setup-basic
wget -O setup.zip http://www.piborg.org/downloads/ledborg/raspbmc-rc5-basic-rev2.zip
sudo apt-get install unzip
unzip setup.zip
chmod +x install.sh
./install.sh
Manual download rev2: http://www.piborg.org/downloads/ledborg/raspbmc-rc5-basic-rev2.zip
Arch Linux
Rev 1, 2013-06-06 or 3.6.11-11-ARCH+
Note that whilst LedBorg works with Arch Linux happily, the GUI is not provided.Also commands later that refer to
/etc/init.d should instead point to /etc/rc.d
mkdir ~/ledborg-setup
cd ~/ledborg-setup
wget -O setup.zip http://www.piborg.org/downloads/ledborg/archlinux-2013-06-06-rev1.zip
pacman -S unzip
unzip setup.zip
chmod +x install.sh
./install.sh
Manual download rev1: http://www.piborg.org/downloads/ledborg/archlinux-2013-06-06-rev1.zip
Rev 2, 2013-06-06 or 3.6.11-11-ARCH+
Note that whilst LedBorg works with Arch Linux happily, the GUI is not provided.Also commands later that refer to
/etc/init.d should instead point to /etc/rc.d
mkdir ~/ledborg-setup
cd ~/ledborg-setup
wget -O setup.zip http://www.piborg.org/downloads/ledborg/archlinux-2013-06-06-rev2.zip
pacman -S unzip
unzip setup.zip
chmod +x install.sh
./install.sh
Manual download rev2: http://www.piborg.org/downloads/ledborg/archlinux-2013-06-06-rev2.zip
Rev 1, 2012-09-18 or 3.2.27-5-ARCH+
Note that whilst LedBorg works with Arch Linux happily, the GUI is not provided.Also commands later that refer to
/etc/init.d should instead point to /etc/rc.dmkdir ~/ledborg-setup
cd ~/ledborg-setup
wget -O setup.zip http://www.piborg.org/downloads/ledborg/archlinux-2012-09-18-rev1.zip
pacman -S unzip
unzip setup.zip
chmod +x install.sh
./install.sh
Manual download rev1: http://www.piborg.org/downloads/ledborg/archlinux-2012-09-18-rev1.zipRev 2, 2012-09-18 or 3.2.27-5-ARCH+
Note that whilst LedBorg works with Arch Linux happily, the GUI is not provided.Also commands later that refer to
/etc/init.d should instead point to /etc/rc.d
mkdir ~/ledborg-setup
cd ~/ledborg-setup
wget -O setup.zip http://www.piborg.org/downloads/ledborg/archlinux-2012-09-18-rev2.zip
pacman -S unzip
unzip setup.zip
chmod +x install.sh
./install.sh
Manual download rev2: http://www.piborg.org/downloads/ledborg/archlinux-2012-09-18-rev2.zip
Source
It is recommended that you use binaries unless you are comfortable building your own source.Note that since building source requires additional packages a larger SD card may be required, a 4GB SD card has proved big enough to build all the source for Raspbian.
There are three parts to the source, the driver, the basic driver, and the GUI. The driver or basic driver is required for operation, the GUI is not.
If you wish to use the install script after building, change the
USER=pi line to correspond to the user to install the package for.Since the proper driver is a kernel module the compiler needs to have the appropriate tools to build kernel modules.
As an alternative the basic driver is also provided if you wish to build a user space program, which should build on any distribution with Make and GCC available, but has the restriction of only having 8 colours available (including all off).
To get the source distribution:
Rev 1
mkdir ~/ledborg-source
cd ~/ledborg-source
wget -O source.zip http://www.piborg.org/downloads/ledborg/source-rev1.zip
unzip source.zip
Manual download rev1: http://www.piborg.org/downloads/ledborg/source-rev1.zip
If you are having trouble building from source for Raspbian see the Build LedBorg drivers for Raspbian help on the forum.
Rev 2
mkdir ~/ledborg-source
cd ~/ledborg-source
wget -O source.zip http://www.piborg.org/downloads/ledborg/source-rev2.zip
unzip source.zip
Manual download rev2: http://www.piborg.org/downloads/ledborg/source-rev2.zip
If you are having trouble building from source for Raspbian see the Build LedBorg drivers for Raspbian help on the forum.
Driver
The driver is a kernel module, as such it needs to be compiled or cross-compiled for the specific version of Linux.Before building the Linux kernel headers must be available, they may already be available or you may need to download them, for example using
sudo apt-get install Linux-headers-$(uname -r)Note that these files appear to be missing from the Raspbian repositories, so you will need to acquire the kernel headers manually, see here for some guidance.
If you are having trouble building from source for Raspbian see the Build LedBorg drivers for Raspbian help on the forum.
Within the ledborg-source folder there will be a driver folder, running
make from this folder should produce a ledborg.ko file.Once build the module can either be added to the system manually, or you can run
~/ledborg-source/install.shBasic Driver
This driver runs in user space and as such should be build-able on any distribution with GCC and Make available.It is preferable to use the proper driver since it exposes all 27 colours by allowing each channel to be either off, 50% on, or 100% on.
In contrast this driver is only capable of fully off or on, thus exposing only 8 colours.
The basic driver will accept colours as specified elsewhere, but will replace 50% on for 100% on, for example a colour code of "201" and "202" will produce the same result with the basic driver.
GUI
The GUI is a Lazarus program, therefore it requires Lazarus to be installed to compile.With Lazarus installed you can either build the program using Lazarus directly or run
make from the GUI folder