JoyLed - Observe your joystick using an LedBorg
We recommend using the new driver free based scripts for LedBorg.
The new driver free examples can be found here, the installation can be found here.
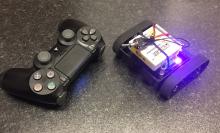
Since LEDs are so useful for all sorts of status information and alerts, we thought we would show how an LedBorg can be used to observe the state of something for testing purposes, like the position of a joystick:
What we have done is taken the JoyBorg script from a previous Mecha Monday and changed it to control an LedBorg rather then our PiCy robot, so we can observe what position the joystick is at visually, without having to read text on a computer screen.
Connecting the joystick to the Raspberry Pi
If you have done this before (such as for the JoyBorg script) you can skip this section.
First plug the joystick into Raspberry Pi, this will be into a USB port from either the joysticks cable, or the wireless receiver.
You will now need to run the following to ensure the joystick drivers are installed:
sudo apt-get -y install joystickThen you will want to run jstest as follows:
jstest /dev/input/js0If you wiggle one of the analogue sticks up and down you should see output like:
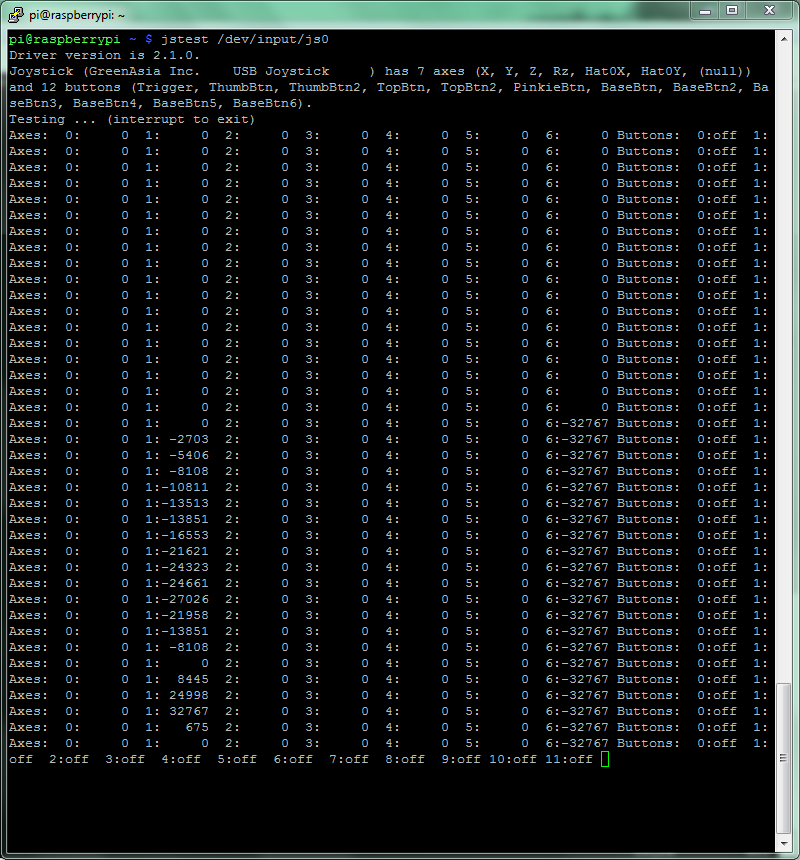
In this case we can see axis 1 is moving, so that is the axis number for that movement, do the same thing for whichever movement you like and make a note of the number.
For those of you trying to get a PS3 controller to work, you will need a bluetooth dongle that the Raspberry Pi is happy with, and the process is a bit more involved.
We followed the guide here to get the PS3 controller to work properly, the axis numbers for the joysticks are:
- Left stick left/right: 0
- Left stick up/down: 1
- Right stick left/right: 2
- Right stick up/down: 3
Get the script running
Now we have a working joystick, we need to download the script code:
cd ~
wget -O JoyLed.py http://www.piborg.org/downloads/JoyLed.txt
chmod +x JoyLed.py
However we will also need to change the settings (that number you remembered earlier).
Open JoyLed.py in a text editor, e.g.
nano JoyLed.pyOn line 18,
axisLed should be changed to the number you noted earlier, e.g. axisLed = 0 if 0 is the axis which changed when moving.Now we are all ready, run the script using:
~/JoyLed.pyYou should now have the LedBorg showing a colour, which corresponds to the following chart:
to -78% |
to -56% |
to -33% |
to -11% |
to +10% (central) |
to +32% |
to +55% |
to +77% |
to +100% |
The camera streaming
The recording we made of this running used the Raspberry Pi camera module to stream video, which we got working by first updating Linux using
sudo apt-get updatesudo apt-get upgradeThen enable the camera after the update using
sudo raspi-configSelect "camera", the select "enable", then "finish" and agree to a reboot.
After all that we need to setup the machine receiving the video (in our case that was windows) which involves installing NetCat (nc) and MPlayer to read from the network and play the feed respectively (a Windows build of NetCat can be found here).
After installing these run the following line on the receiving machine
nc -L -p 5001 | mplayer -vo gl -fps 999 -cache 10240 -(Windows users will probably need the path to these programs, e.g.
"C:\nc\nc.exe" -L -p 5001 | "C:\mplayer\mplayer.exe" -vo gl -fps 999 -cache 10240 -if NetCat lives in the
C:\nc folder and MPlayer lives in the C:\mplayer folder).Then on the Raspberry Pi run
raspivid -w 640 -h 480 -fps 60 -t 99999999 -o - | nc 192.168.0.1 5001replacing
192.168.0.1 with the IP address of the receiving machine.The source
You can download JoyLed.py as text here.
#!/usr/bin/env python
# coding: Latin-1

# Load library functions we want
import time
import pygame

# Make a function to set the LedBorg colour
def SetColour(colour):
    LedBorg=open('/dev/ledborg','w')
    LedBorg.write(colour)
    LedBorg.close()

# Set up our range chart, from fully down to fully up
colours = ['002', '012', '022', '021', '020', '120', '220', '210', '200']

# Settings for JoyLed
axisLed = 1                             # Joystick axis to read for position
interval = 0.1                          # Time between updates in seconds, smaller responds faster but uses more processor time

# Setup pygame and key states
global hadEvent
global moveQuit
hadEvent = True
moveQuit = False
pygame.init()
pygame.joystick.init()
joystick = pygame.joystick.Joystick(0)
joystick.init()
screen = pygame.display.set_mode([300,300])
pygame.display.set_caption("JoyLed - Press [ESC] to quit")

# Function to handle pygame events
def PygameHandler(events):
    # Variables accessible outside this function
    global hadEvent
    global moveQuit
    # Handle each event individually
    for event in events:
        if event.type == pygame.QUIT:
            # User exit
            hadEvent = True
            moveQuit = True
        elif event.type == pygame.KEYDOWN:
            # A key has been pressed, see if it is one we want
            hadEvent = True
            if event.key == pygame.K_ESCAPE:
                moveQuit = True
        elif event.type == pygame.KEYUP:
            # A key has been released, see if it is one we want
            hadEvent = True
            if event.key == pygame.K_ESCAPE:
                moveQuit = False
        elif event.type == pygame.JOYAXISMOTION:
            # A joystick has been moved, read axis positions (-1 to +1)
            position = joystick.get_axis(axisLed)
            # Convert from -1 to +1 range into a colour index range
            index = (position + 1.0) * (len(colours) / 2.0)
            if index >= len(colours):
                index = len(colours) -1
            index = int(index)
            # Set our new colour
            SetColour(colours[index])
try:
    print 'Press [ESC] to quit'
    # Loop indefinitely
    while True:
        # Get the currently pressed keys on the keyboard
        PygameHandler(pygame.event.get())
        if hadEvent:
            # Keys have changed, generate the command list based on keys
            hadEvent = False
            if moveQuit:
                break
        # Wait for the interval period
        time.sleep(interval)
    # Turn LedBorg off
    SetColour('000')
except KeyboardInterrupt:
    # CTRL+C exit, turn LedBorg off
    SetColour('000')