Replacing power on DiddyBorg
Forums:
So, I finally ordered the DiddyBorg and UltraBorg to make myself a robot. However, I'm not that happy with the use of multiple batteries (14 AA's in total) so I'm considering replacing them all with Li-Po batteries but I need some help.
It is my understanding that I cannot use a standard 3.7V battery for the DiddyBorg so I'm shooting for a 7.2V or a 8.4V battery as has been discussed in another thread.
http://www.vapextech.co.uk/batteries/radio-control/8-4v-14-4v/8-4v-5000m...
However, I would also like to be able to recharge the battery while it's fitted in the DiddyBorg. Adafruit carries a board that seem to work (see link below) but it's discontinued. Do you guys know of another solution?
http://www.adafruit.com/products/280
I'm also shooting for a similar solution for the UltraBorg using a standard 3.7V battery. However, the UltraBorg wants 5V so again, Adafruit has a solution for that (see link below).
http://www.adafruit.com/products/2030
Or is there perhaps a better solution for powering both the DiddyBorg and UltraBorg using Li-Po batteries? Note that I'm fairly new to this so be gentle. :)
- Log in to post comments


piborg
Mon, 07/27/2015 - 12:00
Permalink
Replacing power on DiddyBorg
You are right about a 3.7V not being enough to run DiddyBorg.
Because of the board requirements the voltage of the battery pack must be between 7-25V
I would recommend going for the 8.4V battery pack, the 7.2V will likely drop below the 7V threshold as it starts to get flat, when below 7V the BattBorg will stop powering the Raspberry Pi.
Personally I think the easiest way to charge that style battery pack would be to arrange it so the plug sits at the back of the DiddyBorg.
That way when the cable is unplugged to turn him off it can be attached directly to a standard charger without actually removing the battery.
You can power the UltraBorg from the same battery pack via a 5V regulator.
You could do this using a BattBorg or a regulator chip capable of more than 1A.
This way there is only one battery pack to charge up, or you could use a second battery pack to keep the DiddyBorg running longer.
Tubbe
Tue, 07/28/2015 - 19:32
Permalink
Thank you for the response. I
Thank you for the response. I'll order an 8.4v battery and see how it works out. Do you know if some shop in my country (Sweden) carries the BattBorg? If not, do you know of an alternative to BattBorg? It seems a bit over the top to order just a BattBorg all the way from the UK, namely. :)
piborg
Wed, 07/29/2015 - 11:48
Permalink
Powering the servo 5V on UltraBorg
As far as I know there is not a shop carrying PiBorg products in Sweden at the moment unfortunately.
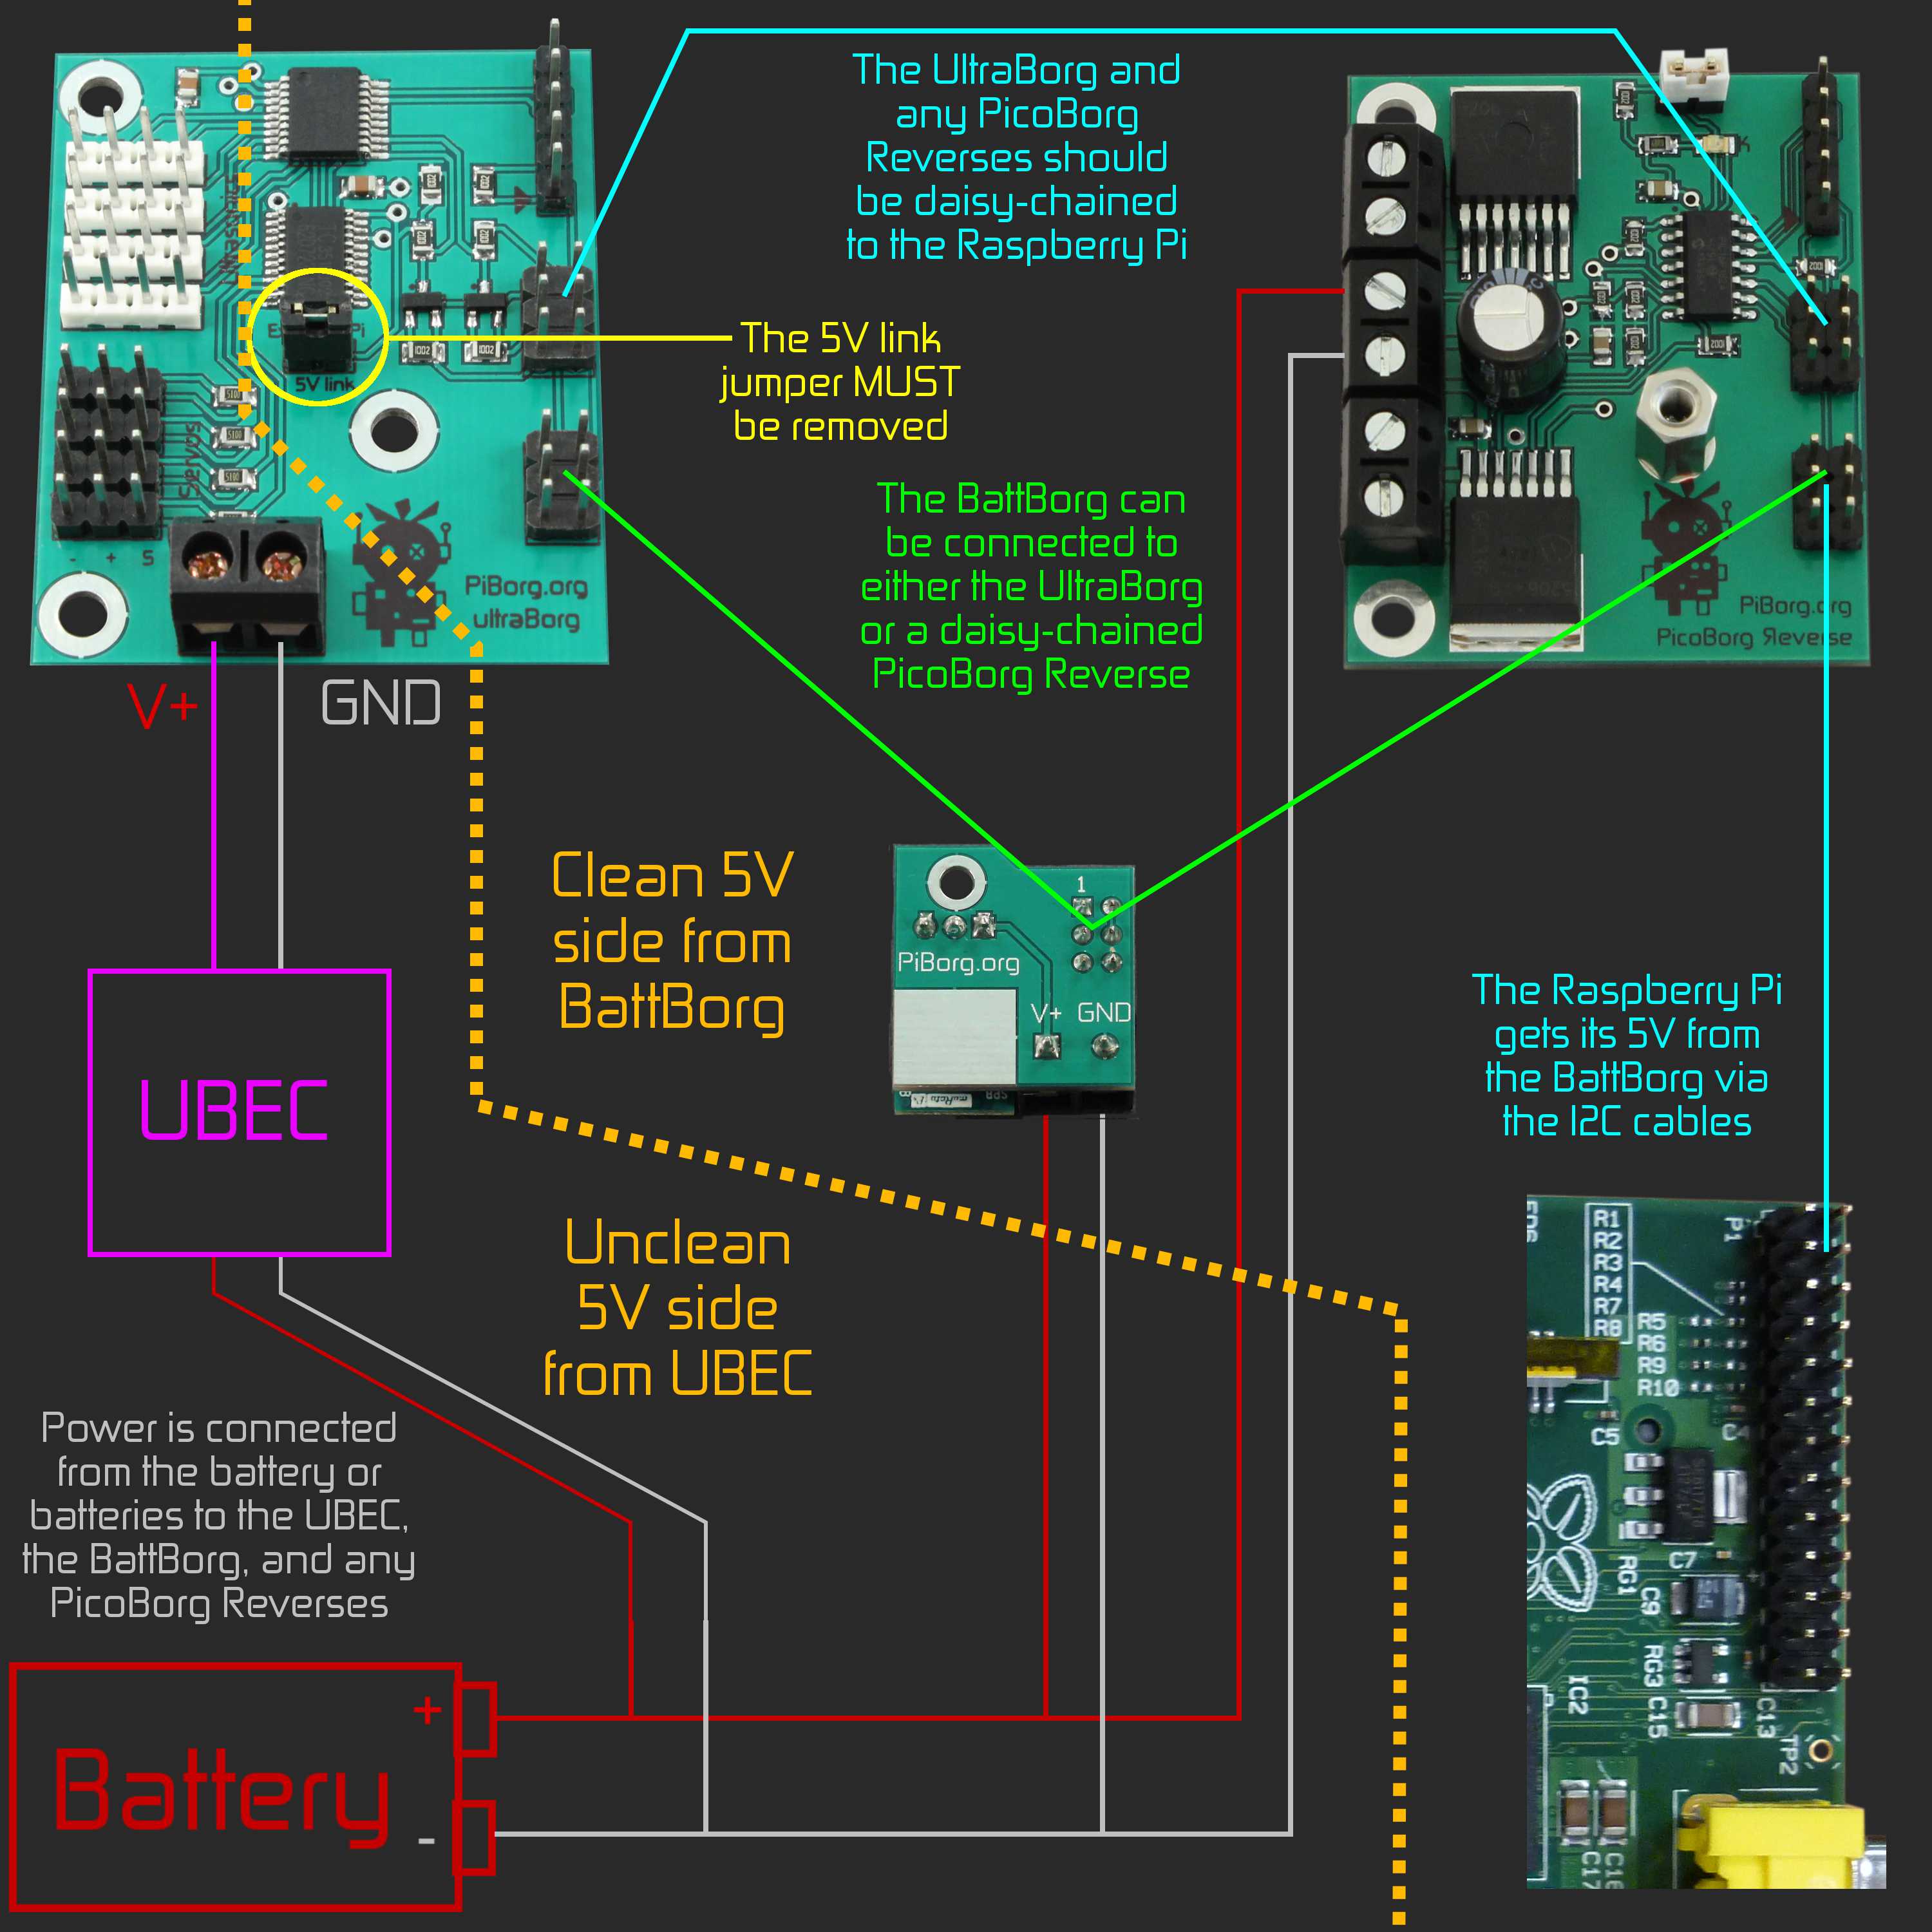
What you could do instead is use a UBEC to power the servo 5V line.
UBECs are used in most RC cars so they should be fairly easy to come by.
This is the kind of thing you are looking for:
http://www.ebay.co.uk/itm/2-6S-Lipo-BEC-UBEC-3A-5V-Input-5-23V-for-Recei...
Make sure you do not power the Raspberry Pi from the UBEC output.
This is because UBECs only produce an approximate 5V, the Raspberry Pi needs a precise, clean 5V supply.
On the other hand servos and the ultrasonic modules only require an approximate 5V and should work fine with a UBEC supply.
This is how we would recommend wiring the battery pack to both the BattBorg and UBEC at the same time:

By keeping the two 5V sides separated like this it means all of the noise from the servos is kept on the unclean 5V side powered by the UBEC.
This prevents the servo movement from affecting the 5V supply to the Raspberry Pi, allowing the BattBorg to supply a clean 5V to keep it running happily.
cleric boomer
Thu, 10/08/2015 - 15:34
Permalink
The only comment I will make
The only comment I will make is ensure that you are aware of all the issues with LiPo batteries.
Make sure you use a balance charger and never leave charging batteries alone. I use LiPo batteries in rc models and they can be temperamental. There are warnings about discharge levels, if they discharge too much below a threshold level they will not recharge.
They can heat up when charging (possibility of ignition, but don't know how true that is).
I am about to order my first robot and was considering using a power pack if that is feasible
richardandaliso...
Thu, 10/08/2015 - 16:16
Permalink
battborg, picoborg, SR04 ultraborg
I am planning to add an ultraborg to my diddyborg, but will only be connecting SR04 sensors, so I was wondering whether it was OK to just daisy chain the battborg, picoborg reverse and ultraborg? Is there a handy piborg diagram to explain how to do that? Or would you always recommend a second 5V supply for the ultraborg?
piborg
Thu, 10/08/2015 - 18:58
Permalink
Adding an UltraBorg to DiddyBorg
Daisy-chaining an UltraBorg to the PiocBorg Reverse is how we would recommend adding one to a DiddyBorg.
The boards are designed so they will work together using the same 6-pin connector :)
You can connect either board directly to the Rapsberry Pi and daisy-chain the other board from the first.
You will then want to connect the BattBorg on to the remaining 6-pin connector on the second board.
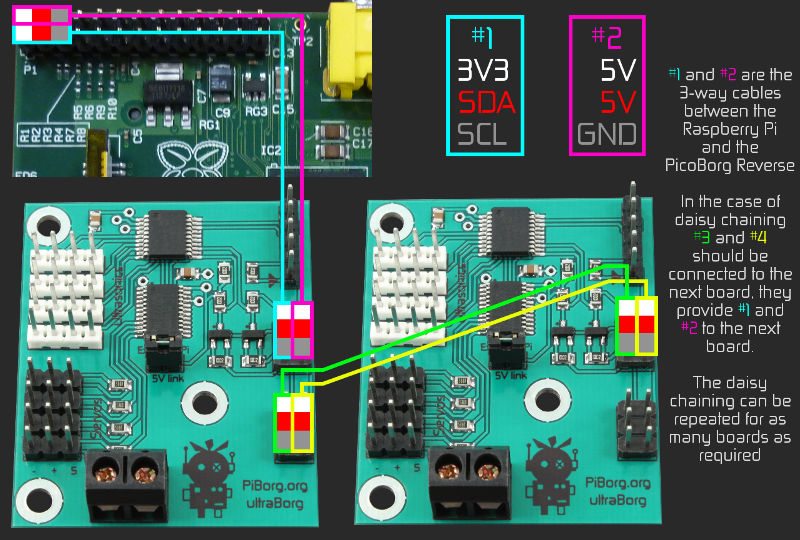
Using this diagram as a reference:

Use the PicoBorg Reverse as either the left or right board in the diagram, instead of a second UltraBorg.
Attach the BattBorg to the unused bottom 6-pin connector on the right board.
Since you are only using ultrasonics you can leave the 5V link jumper attached.
This will use the 5V from the BattBorg and avoid the need to attach a 5V supply to the screw terminals.
richardandaliso...
Thu, 10/08/2015 - 19:44
Permalink
Brilliant - thank you!
Thank you piborg - I kind of thought that was the way to do it, but good to hear it from someone who actually knows what they are doing :)
Best wishes
Richard
DonOregano
Fri, 01/22/2016 - 11:52
Permalink
Any photos of your solutions?
I'd like to see pictures of any solutions you've come up with! Either for the LiPo battery thing, or the Ultraborg installation.
I'm currently considering how best to fit a Sense Hat and an Ultraborg into my DiddyBorg (red), and I'm in need of ideas of how to make everything fit. I'm also adding some LED-headlights and a relay in there, so it is getting a bit cramped...
richardandaliso...
Fri, 01/22/2016 - 12:50
Permalink
adding an ultraborg
the best photo is probably the one at http://elmorobogo.blogspot.co.uk/2015/10/elmo-goes-ultrasonic.html
we added the ultraborg on two standoffs that positioned it over the top of the raspberry pi - we then had to add a (10mm?) standoff on top of the piborg standoff so that we could fit everything under the lid.