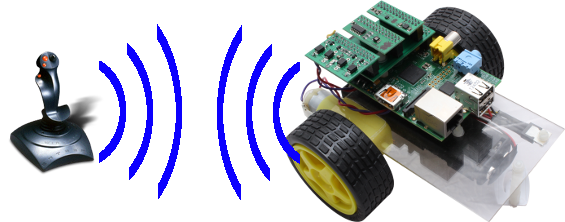
RemoteJoyBorg2 - Control a PicoBorg robot with LedBorg lights from a remote joystick
So you have seen RemoteKeyBorg2 and you have seen RemoteJoyBorg and want to upgrade it to add the LedBorg functionality to your PicoBorg based robot car (such as PiCy).
Well it would seem a shame not to be able to, so we have made RemoteJoyBorg2C.py, an upgraded version of RemoteJoyBorgC.py which reads the joystick or gamepad buttons as well, mapping them to LedBorg sequences.
Most of the setup is the same as the original RemoteJoyBorg, but we have now added joystick buttons into the mix, for those who need a reminder or have not seen RemoteJoyBorg before the instructions below are complete.
Since this script replaces the functionality of RemoteKeyBorg2C.py, you will need to have RemoteKeyBorg2S.py running on the Pi connected to your PicoBorg and LedBorg.
Here's the code, you can download the RemoteKeyBorg2S script file as text here.
Save the text file on your Raspberry Pi as RemoteKeyBorg2S.py
Make the script executable using
and run on the Raspberry Pi with the PicoBorg using
The full instructions can be found on the RemoteKeyBorg2 page.
This may also help if you are running Linux on another machine.
First plug the joystick into Raspberry Pi, this will be into a USB port from either the joysticks cable, or the wireless receiver.
You will now need to run the following to ensure the joystick drivers are installed:
Then you will want to run jstest as follows:
If you wiggle one of the analogue sticks up and down you should see output like:
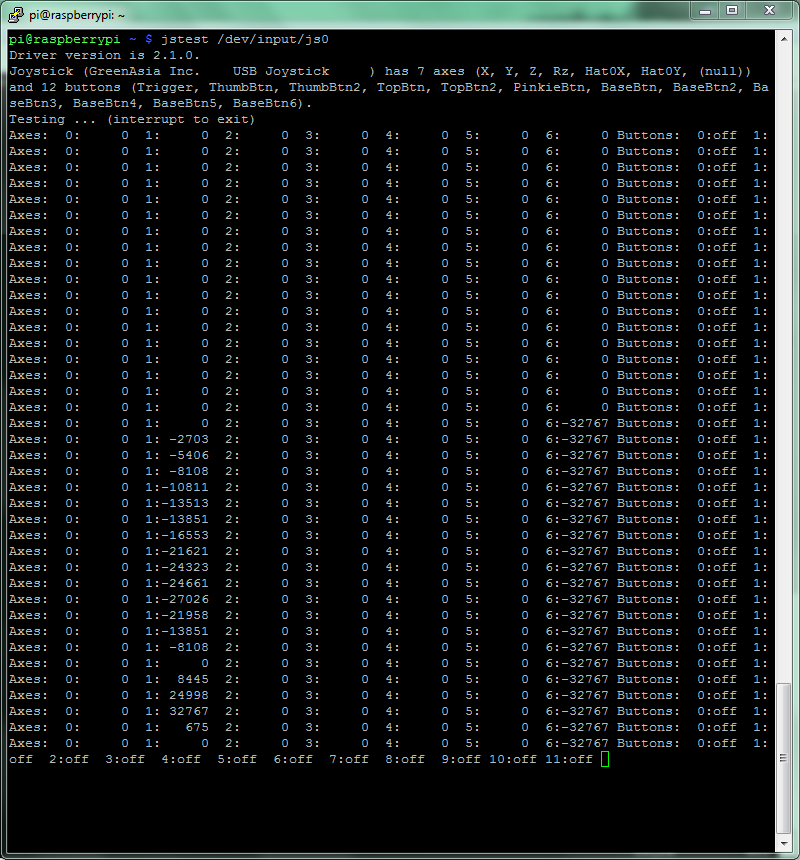
In this case we can see axis 1 is moving, so that is our up/down axis, do the same thing for a left/right movement (they can be the same stick or different, which ever you prefer) and make a note of both numbers.
For those of you trying to get a PS3 controller to work, you will need a bluetooth dongle that the Raspberry Pi is happy with, and the process is a bit more involved.
We followed the guide here to get the PS3 controller to work properly, the axis numbers for the joysticks are:
Using
Make a note of as many buttons as you want for later.
For those using a PS3 controller many buttons are available to you, their codes are:
First plug the joystick into your computer, making sure you install any necessary drivers.
You may need to guess which axis numbers correspond to which movements on the joystick, try numbers in sequential order starting from 0 and 1 if in doubt.
You will also need to install Python and pygame so the script can be run.
Now we have a working joystick, we need to download the script code:
However we will also need to change the settings (those numbers you remembered earlier).
Open RemoteJoyBorg2C.py in a text editor, e.g.
On line 16,
If up / down seems to be swapped, change line 17 to read
On line 18,
If left / right seems to be swapped, change line 19 to read
Lines 27 to 30 set the
Lines 33 to 36 set the various
Finally on line 10 make sure
Now we are all ready, run the script using:
on Linux or you favoured method under Windows.
You can download RemoteJoyBorg2C.py as text here.
Well it would seem a shame not to be able to, so we have made RemoteJoyBorg2C.py, an upgraded version of RemoteJoyBorgC.py which reads the joystick or gamepad buttons as well, mapping them to LedBorg sequences.
Most of the setup is the same as the original RemoteJoyBorg, but we have now added joystick buttons into the mix, for those who need a reminder or have not seen RemoteJoyBorg before the instructions below are complete.
Setting up the Raspberry Pi
Since this script replaces the functionality of RemoteKeyBorg2C.py, you will need to have RemoteKeyBorg2S.py running on the Pi connected to your PicoBorg and LedBorg.
Here's the code, you can download the RemoteKeyBorg2S script file as text here.
Save the text file on your Raspberry Pi as RemoteKeyBorg2S.py
Make the script executable using
chmod +x RemoteKeyBorg2S.pyand run on the Raspberry Pi with the PicoBorg using
sudo ./RemoteKeyBorg2S.pyThe full instructions can be found on the RemoteKeyBorg2 page.
Connecting the joystick to a Raspberry Pi
This may also help if you are running Linux on another machine.
First plug the joystick into Raspberry Pi, this will be into a USB port from either the joysticks cable, or the wireless receiver.
You will now need to run the following to ensure the joystick drivers are installed:
sudo apt-get -y install joystickThen you will want to run jstest as follows:
jstest /dev/input/js0If you wiggle one of the analogue sticks up and down you should see output like:
In this case we can see axis 1 is moving, so that is our up/down axis, do the same thing for a left/right movement (they can be the same stick or different, which ever you prefer) and make a note of both numbers.
For those of you trying to get a PS3 controller to work, you will need a bluetooth dongle that the Raspberry Pi is happy with, and the process is a bit more involved.
We followed the guide here to get the PS3 controller to work properly, the axis numbers for the joysticks are:
- Left stick left/right: 0
- Left stick up/down: 1
- Right stick left/right: 2
- Right stick up/down: 3
Using
jstest as before, press a button you wish to use, the corresponding number should change from off to on, if many are on release the button again and it should return to off, confirming the number.Make a note of as many buttons as you want for later.
For those using a PS3 controller many buttons are available to you, their codes are:
- Square: 15
- Triangle: 12
- Circle: 13
- Cross: 14
- D-pad left: 7
- D-pad right: 5
- D-pad up: 4
- D-pad down: 6
- L1: 10
- L2: 8
- R1: 11
- R2: 9
- Select: 0
- Start: 3
- Left stick (L3): 1
- Right stick (R3): 2
- PS button: 16
Connecting the joystick to a Windows based machine
First plug the joystick into your computer, making sure you install any necessary drivers.
You may need to guess which axis numbers correspond to which movements on the joystick, try numbers in sequential order starting from 0 and 1 if in doubt.
You will also need to install Python and pygame so the script can be run.
Get the script running
Now we have a working joystick, we need to download the script code:
cd ~
wget -O RemoteJoyBorg2C.py http://www.piborg.org/downloads/RemoteJoyBorg2C.txt
chmod +x RemoteJoyBorg2C.py
Alternatively download the code here, and save the file as RemoteJoyBorg2C.py, on Linux you will also need to make the script executable
However we will also need to change the settings (those numbers you remembered earlier).
Open RemoteJoyBorg2C.py in a text editor, e.g.
nano RemoteJoyBorg2C.pyOn line 16,
axisUpDown should be changed to the first number you noted earlier, e.g. axisUpDown = 0 if 0 is the axis which changed when moving up and down.If up / down seems to be swapped, change line 17 to read
axisUpDownInverted = True instead.On line 18,
axisLeftRight should be changed to the second number you noted earlier, e.g. axisLeftRight = 1 if 1 is the axis which changed when moving left and right.If left / right seems to be swapped, change line 19 to read
axisLeftRightInverted = True instead.Lines 27 to 30 set the
ledSeq values, these are the sequences attached to the buttons (they are the same defaults as RemoteKeyBorg2C.py uses).Lines 33 to 36 set the various
butLedSeq assignments for joystick buttons to sequences, fill in the button numbers you noted earlier for the sequences, use -1 if you do not want a sequence to be available.Finally on line 10 make sure
broadcastIP is set to the correct IP address for the Raspberry Pi running RemoteKeyBorgS.py, e.g. broadcastIP = '192.168.0.15', you can use '255' for the last number to make it talk to any address that matches the first 3 numbers, assuming your network permits broadcasting.Now we are all ready, run the script using:
~/RemoteJoyBorg2C.pyon Linux or you favoured method under Windows.
The source
You can download RemoteJoyBorg2C.py as text here.
#!/usr/bin/env python
# coding: Latin-1

# Load library functions we want
import socket
import time
import pygame

# Settings for the RemoteJoyBorg client
broadcastIP = '192.168.0.255'           # IP address to send to, 255 in one or more positions is a broadcast / wild-card
broadcastPort = 9038                    # What message number to send with
leftDrive = 1                           # Drive number for left motor
rightDrive = 4                          # Drive number for right motor
interval = 0.1                          # Time between updates in seconds, smaller responds faster but uses more processor time
regularUpdate = True                    # If True we send a command at a regular interval, if False we only send commands when keys are pressed or released
axisUpDown = 1                          # Joystick axis to read for up / down position
axisUpDownInverted = False              # Set this to True if up and down appear to be swapped
axisLeftRight = 3                       # Joystick axis to read for left / right position
axisLeftRightInverted = False           # Set this to True if left and right appear to be swapped

# Setup the connection for sending on
sender = socket.socket(socket.AF_INET, socket.SOCK_DGRAM, socket.IPPROTO_UDP)       # Create the socket
sender.setsockopt(socket.SOL_SOCKET, socket.SO_BROADCAST, 1)                        # Enable broadcasting (sending to many IPs based on wild-cards)
sender.bind(('0.0.0.0', 0))                                                         # Set the IP and port number to use locally, IP 0.0.0.0 means all connections and port 0 means assign a number for us (do not care)

# LedBorg sequences, first entry is delay between steps in seconds
ledSeq0 = ['0.5']   # Off / no sequence
ledSeq1 = ['0.1', '100', '200', '100', '001', '002', '001']
ledSeq2 = ['0.3', '200', '210', '220', '120', '020', '021', '022', '012', '002', '102', '202', '201']
ledSeq3 = ['0.5', '100', '200', '211', '200']

# Joystick button associations
butLedSeq0 = 0
butLedSeq1 = 1
butLedSeq2 = 2
butLedSeq3 = 3

# Setup pygame and key states
global hadEvent
global moveUp
global moveDown
global moveLeft
global moveRighte
global moveQuit
global newLedSequence
global ledSequence
hadEvent = True
moveUp = False
moveDown = False
moveLeft = False
moveRight = False
moveQuit = False
newLedSequence = False
ledSequence = ledSeq0
pygame.init()
pygame.joystick.init()
joystick = pygame.joystick.Joystick(0)
joystick.init()
screen = pygame.display.set_mode([300,300])
pygame.display.set_caption("RemoteKeyBorg - Press [ESC] to quit")

# Function to handle pygame events
def PygameHandler(events):
    # Variables accessible outside this function
    global hadEvent
    global moveUp
    global moveDown
    global moveLeft
    global moveRight
    global moveQuit
    global newLedSequence
    global ledSequence
    # Handle each event individually
    for event in events:
        if event.type == pygame.QUIT:
            # User exit
            hadEvent = True
            moveQuit = True
        elif event.type == pygame.KEYDOWN:
            # A key has been pressed, see if it is one we want
            hadEvent = True
            if event.key == pygame.K_ESCAPE:
                moveQuit = True
        elif event.type == pygame.KEYUP:
            # A key has been released, see if it is one we want
            hadEvent = True
            if event.key == pygame.K_ESCAPE:
                moveQuit = False
        elif event.type == pygame.JOYAXISMOTION:
            # A joystick has been moved, read axis positions (-1 to +1)
            hadEvent = True
            upDown = joystick.get_axis(axisUpDown)
            leftRight = joystick.get_axis(axisLeftRight)
            # Invert any axes which are incorrect
            if axisUpDownInverted:
                upDown = -upDown
            if axisLeftRightInverted:
                leftRight = -leftRight
            # Determine Up / Down values
            if upDown < -0.1:
                moveUp = True
                moveDown = False
            elif upDown > 0.1:
                moveUp = False
                moveDown = True
            else:
                moveUp = False
                moveDown = False
            # Determine Left / Right values
            if leftRight < -0.1:
                moveLeft = True
                moveRight = False
            elif leftRight > 0.1:
                moveLeft = False
                moveRight = True
            else:
                moveLeft = False
                moveRight = False
        elif event.type == pygame.JOYBUTTONDOWN:
            # A button on the joystick / gamepad just got pushed down
            hadEvent = True
            # Check if the button matches an LedBorg sequence key
            if event.button == butLedSeq0:
                ledSequence = ledSeq0
                newLedSequence = True
            elif event.button == butLedSeq1:
                ledSequence = ledSeq1
                newLedSequence = True
            elif event.button == butLedSeq2:
                ledSequence = ledSeq2
                newLedSequence = True
            elif event.button == butLedSeq3:
                ledSequence = ledSeq3
                newLedSequence = True

try:
    print 'Press [ESC] to quit'
    # Loop indefinitely
    while True:
        # Get the currently pressed keys on the keyboard
        PygameHandler(pygame.event.get())
        if newLedSequence:
            newLedSequence = False
            # Send a command to change the LedBorg sequence
            command = 'LEDBORG:'
            for ledStep in ledSequence:
                command += ledStep + ':'
            command = command[:-1]                                  # Strip the trailing colon
            sender.sendto(command, (broadcastIP, broadcastPort))
        if hadEvent or regularUpdate:
            # Keys have changed, generate the command list based on keys
            hadEvent = False
            driveCommands = ['X', 'X', 'X', 'X']                    # Default to do not change
            if moveQuit:
                break
            elif moveLeft:
                driveCommands[leftDrive - 1] = 'OFF'
                driveCommands[rightDrive - 1] = 'ON'
            elif moveRight:
                driveCommands[leftDrive - 1] = 'ON'
                driveCommands[rightDrive - 1] = 'OFF'
            elif moveUp:
                driveCommands[leftDrive - 1] = 'ON'
                driveCommands[rightDrive - 1] = 'ON'
            else:
                # None of our expected keys, stop
                driveCommands[leftDrive - 1] = 'OFF'
                driveCommands[rightDrive - 1] = 'OFF'
            # Send the drive commands
            command = ''
            for driveCommand in driveCommands:
                command += driveCommand + ','
            command = command[:-1]                                  # Strip the trailing comma
            sender.sendto(command, (broadcastIP, broadcastPort))
        # Wait for the interval period
        time.sleep(interval)
    # Inform the server to stop
    sender.sendto('ALLOFF', (broadcastIP, broadcastPort))
except KeyboardInterrupt:
    # CTRL+C exit, inform the server to stop
    sender.sendto('ALLOFF', (broadcastIP, broadcastPort))